|
Dobrica Pavlinušić's random unstructured stuff
ESP8266
links
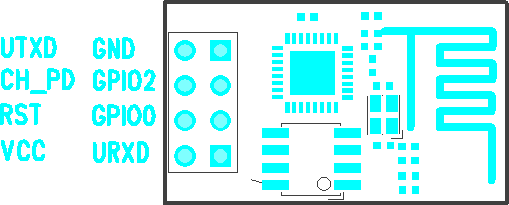
serial portbaud rate 115200 AT+GMR 00160901 OK AT+RST OK ets Jan 8 2013,rst cause:4, boot mode:(3,7) wdt reset load 0x40100000, len 24444, room 16 tail 12 chksum 0xe0 ho 0 tail 12 room 4 load 0x3ffe8000, len 3168, room 12 tail 4 chksum 0x93 load 0x3ffe8c60, len 4956, room 4 tail 8 chksum 0xbd csum 0xbd ready ESP-201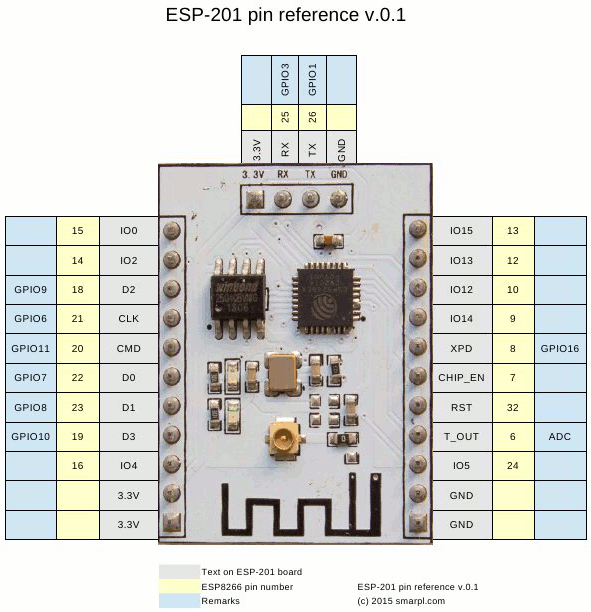 from http://smarpl.com/content/esp8266-esp-201-module-first-impressions One quirk with the ESP-201 is that is IO15 has to be grounded for the device to function. To flash the device IO00 has to be grounded. AT+RST OK ets Jan 8 2013,rst cause:4, boot mode:(3,7) wdt reset load 0x40100000, len 212, room 16 tail 4 chksum 0x5e load 0x3ffe8000, len 788, room 4 tail 0 chksum 0x1c load 0x3ffe8314, len 72, room 8 tail 0 chksum 0x55 csum 0x55 jump to user1 modify flash for dio instead of qio: http://smarpl.com/content/esp8266-esp-201-module-freeing-gpio9-and-gpio10 nodemcu
esptool.pydpavlin@x200:/rest/cvs/esptool$ git remote -v origin https://github.com/themadinventor/esptool (fetch) origin https://github.com/themadinventor/esptool (push) dpavlin@x200:/rest/cvs/esptool$ ./esptool.py --port /dev/ttyUSB2 read_mac Connecting... MAC: 18:fe:34:a0:38:72 flash firmwaredpavlin@blue:/opt/Espressif/esptool$ ./esptool.py read_mac Connecting... MAC: 18:fe:34:a0:38:72 dpavlin@blue:/opt/Espressif/esptool$ ./esptool.py --port /dev/ttyUSB0 write_flash 0x00000 ../nodemcu-firmware/pre_build/latest/nodemcu_latest.bin Connecting... Erasing flash... Writing at 0x00010800... (17 %) Get latest build from https://github.com/nodemcu/nodemcu-firmware/releases dpavlin@x200:/rest/cvs/esptool$ ./esptool.py --port /dev/ttyUSB2 write_flash 0x00000 ./nodemcu_float_0.9.6-dev_20150406.bin dpavlin@x200:/rest/cvs/esptool$ microcom -p /dev/ttyUSB2 -s 9600 connected to /dev/ttyUSB2 Escape character: Ctrl-\ Type the escape character followed by c to get to the menu or q to quit > node.restart() NodeMCU 0.9.6 build 20150406 powered by Lua 5.1.4 lua: cannot open init.lua > build from sourceFor latest features, you might want to rebuild software from github source dpavlin@x200:/rest/cvs$ git clone https://github.com/pfalcon/esp-open-sdk.git dpavlin@x200:/rest/cvs/esp-open-sdk$ export PATH=/rest/cvs/esp-open-sdk/xtensa-lx106-elf/bin:$PATH git clone https://github.com/nodemcu/nodemcu-firmware.git cd nodemcu-firmware dpavlin@x200:/rest/cvs/nodemcu-firmware$ git checkout -b dev origin/dev Branch dev set up to track remote branch dev from origin. Switched to a new branch 'dev' make # check that device is in boot loader mode dpavlin@x200:/rest/cvs/nodemcu-firmware$ ../esptool/esptool.py --port /dev/ttyUSB1 read_mac Connecting... MAC: 18:fe:34:99:f2:83 # flash new firmware dpavlin@x200:/rest/cvs/nodemcu-firmware$ make flash ESPPORT=/dev/ttyUSB1 make -C ./app flash make[1]: Entering directory '/rest/cvs/nodemcu-firmware/app' ../tools/esptool.py --port /dev/ttyUSB1 write_flash 0x00000 ../bin/0x00000.bin 0x10000 ../bin/0x10000.bin Connecting... Erasing flash... Writing at 0x0000c500... (100 %) Erasing flash... Writing at 0x00068c00... (100 %) Leaving... make[1]: Leaving directory '/rest/cvs/nodemcu-firmware/app' A library for the Microchip MCP3021 A/D converter for use with the ESP8266.https://github.com/AllAboutEE/ESP8266-MCP3021-Library nodemcu-uploaderdpavlin@x200:/rest/cvs$ git clone https://github.com/kmpm/nodemcu-uploader dpavlin@x200:/rest/cvs/nodemcu-uploader$ ./nodemcu-uploader.py --port /dev/ttyUSB2 --baud 9600 file list Listing files for key,value in pairs(file.list()) do print(key,value) end > OpenOCD JTAGhttps://github.com/projectgus/openocd http://www.esp8266.com/viewtopic.php?f=9&t=1871#p11157
verified on https://visualgdb.com/tutorials/esp8266/nodemcu/jtag/ ESP8266 as wireless JTAG Programmerhttps://github.com/emard/wifi_jtag WIFIsoftware serial
Sonoff
https://www.itead.cc/sonoff-wifi-wireless-switch.html pinoutMy sonoff is early model, with just 4 pins (instead of 5)
1 - VCC Programminguse dio not qio to fix checksum errors CH340 USB to ESP8266 ESP-01 Wifi Module AdapterIt doesn't have GPIO0 connected to ground, so flashing doesn't work! http://www.esp8266.com/wiki/doku.php?id=all-in-one-esp-usb-converter ESP-01S DHT11 board#define DHTTYPE DHT11 #define DHTPIN 2 DHT dht(DHTPIN, DHTTYPE, 11); adding IR led
Button is connected to RST, and if you want to add IR led (with transistor and resistor) it seems that only KEYESTUDIO ESP8266 ESP-12F CH340G WiFi Module Board for Arduino NodeMcu |
