|
Weblog: recent changes

in Dobrica Pavlinušić's random unstructured stuff
|
|
|
lg.conf
SerialSerial need older firmware, 3.24 is known to work, from 3.67 serial doesn't work any more! http://openlgtv.org.ru/wiki/index.php/Basic_RS-232C_connection_setup connect to serial, enter "debug" and enter, then press d to get menu http://code.google.com/p/lg-tv-command/ dpavlin@x200:/rest/cvs$ git svn clone -s http://lg-tv-command.googlecode.com/svn/ lg-tv-command dpavlin@x200:/rest/cvs$ cd lg-tv-command/ dpavlin@x200:/rest/cvs/lg-tv-command$ make cc -std=gnu99 -Wall -o lg-tv-command lg-tv-command.c dpavlin@x200:/rest/cvs/lg-tv-command$ export LG_DEVICE=/dev/ttyUSB0 dpavlin@x200:/rest/cvs/lg-tv-command$ ./lg-tv-command Power Power: ka 01 ff Current value: 1 (0x01). Range: 0-1. dpavlin@x200:/rest/cvs/lg-tv-command$ LG_DEVICE=/dev/ttyUSB0 LG_ID=1 ./lg-tv-command InputSelect HDMI1 xb 01 90 dpavlin@x200:/rest/cvs/lg-tv-command$ LG_DEVICE=/dev/ttyUSB0 LG_ID=1 ./lg-tv-command InputSelect RGB1 xb 01 60 http://openlgtv.org.ru/wiki/index.php/How_to_log_your_TV (change boud rate) Shell accesshttp://openlgtv.org.ru/wiki/index.php/Debug_mode_connection#Busybox_shell_access Firmwarehttp://openlgtv.org.ru/wiki/index.php/Firmware_versions_history_%28Saturn_6_models%29 epakhttp://ventoso.org/luca/lghacks/epak.py Sourcehttp://openlgtv.org.ru/wiki/index.php/Opensource_packages_list Hacksopenlgtv (older)http://mikko.korkalo.fi/openlgtv/ LGMOD
http://openlgtv.org.ru/wiki/index.php/LGMOD IR
dpavlin@blue:~$ dmesg [71741.015031] usb 3-1.6.2: new full-speed USB device number 6 using ehci_hcd [71741.110203] usb 3-1.6.2: New USB device found, idVendor=04d8, idProduct=fd08 [71741.110208] usb 3-1.6.2: New USB device strings: Mfr=1, Product=2, SerialNumber=0 [71741.110211] usb 3-1.6.2: Product: USBIRtoy (CDC-232) [71741.110213] usb 3-1.6.2: Manufacturer: DangerousPrototypes.com [71741.110631] cdc_acm 3-1.6.2:1.0: This device cannot do calls on its own. It is not a modem. [71741.110660] cdc_acm 3-1.6.2:1.0: ttyACM0: USB ACM device dpavlin@blue:/etc/lirc/remote$ lsusb | grep Microchip Bus 003 Device 007: ID 04d8:fd08 Microchip Technology, Inc. root@blue:~# rmmod cdc_acm root@blue:~# modprobe usbserial vendor=0x04d8 product=0xfd08 sourcedpavlin@blue:/blue$ svn co http://dangerous-prototypes-open-hardware.googlecode.com/svn/trunk/USB_IR_Toy/
dpavlin@blue:~$ sudo apt-get install lirc
HDHomeRun DUAL http://www.silicondust.com/support/linux/
hdhomerun_configdpavlin@klin:~/klin/HDHomeRun/libhdhomerun$ ./hdhomerun_config discover hdhomerun device 12208216 found at 192.168.3.78 dpavlin@svarog:~/HDHomeRun/libhdhomerun$ ./hdhomerun_config discover hdhomerun device 12208216 found at 192.168.1.194 dpavlin@klin:~/klin/HDHomeRun/libhdhomerun$ ./hdhomerun_config 12208216 get help Supported configuration options: /sys/copyright /sys/dvbc_modulation /sys/debug /sys/features /sys/hwmodel /sys/model /sys/restart <resource> /sys/version /tuner<n>/channel <modulation>:<freq|ch> /tuner<n>/channelmap <channelmap> /tuner<n>/debug /tuner<n>/filter "0x<nnnn>-0x<nnnn> [...]" /tuner<n>/lockkey /tuner<n>/program <program number> /tuner<n>/streaminfo /tuner<n>/status /tuner<n>/target <ip>:<port> upgradedpavlin@klin:~/klin/HDHomeRun/libhdhomerun$ ./hdhomerun_config 12208216 upgrade ../hdhomerun3_dvbtc_firmware_20170930.bin uploading firmware... upgrading firmware... rebooting... upgrade complete - now running firmware 20170930 guidpavlin@klin:~/klin/HDHomeRun/hdhomerun_config_gui$ ./configure dpavlin@klin:~/klin/HDHomeRun/hdhomerun_config_gui$ make dpavlin@klin:~/klin/HDHomeRun/hdhomerun_config_gui$ LD_PRELOAD=../libhdhomerun/libhdhomerun.so ./src/hdhomerun_config_gui # on svarog dpavlin@svarog:~/HDHomeRun/hdhomerun_config_gui$ cat debian-install.sh sudo apt install pkg-config libgtk2.0-dev ./configure make dpavlin@svarog:~/HDHomeRun/hdhomerun_config_gui$ sh -xe debian-install.sh scandpavlin@svarog:~/HDHomeRun/libhdhomerun$ ./hdhomerun_config 12208216 scan 0 scan-0 dpavlin@svarog:~/HDHomeRun/libhdhomerun$ ./hdhomerun_config 12208216 scan 1 scan-1 config
channelmaproot@svarog:~# hdhomerun_config 12208216 get /tuner0/channelmap eu-bcast root@svarog:~# hdhomerun_config 12208216 get /tuner1/channelmap eu-bcast tune to channelroot@svarog:~# hdhomerun_config 12208216 set /tuner0/channel auto:57 root@svarog:/home/dpavlin/HDHomeRun/libhdhomerun# hdhomerun_config 12208216 get /sys/features channelmap: eu-bcast eu-cable au-bcast au-cable tw-bcast tw-cable modulation: t8qam64 t8qam16 t8qpsk t7qam64 t7qam16 t7qpsk t6qam64 t6qam16 t6qpsk a8qam256-* a8qam128-* a8qam64-* a7qam256-* a7qam128-* a7qam64-* a6qam256-* a6qam128-* a6qam64-* auto-modulation: auto auto8t auto7t auto6t auto8c auto7c auto6c # signal strenght root@svarog:~# hdhomerun_config 12208216 get /tuner0/status ch=auto:57 lock=t8qam16 ss=82 snq=91 seq=100 bps=14930208 pps=0 root@svarog:~# hdhomerun_config 12208216 get /tuner0/debug tun: ch=auto:57 lock=t8qam16:762000000 ss=81 snq=91 seq=100 dbg=-502/8744 dev: bps=14930208 resync=0 overflow=0 ts: bps=14930208 te=0 crc=0 net: pps=0 err=0 stop=0 detecting programs on channelroot@svarog:~# hdhomerun_config 12208216 get /tuner0/streaminfo 4404: 0 TREND TV 4434: 0 Laudato TV tsid=0x0D44 onid=0x20BF root@svarog:~# hdhomerun_config 12208216 set /tuner0/program 4404 root@svarog:~# hdhomerun_config 12208216 get /tuner0/filter 0x1158-0x115b play videodpavlin@klin:~$ ssh svarog hdhomerun_config 12208216 save /tuner0 - | ffplay -fflags nobuffer - It seems that I have to restart ffplay when changing channels Similar boardsB3606https://github.com/UsrnameTaken/B3606 D3806I have unit, there is no alternative firmware for this model but there is for: https://github.com/delboy711/BST900 https://www.falatic.com/index.php/161/minghe-buckboost-converters-handy-if-youre-careful B3603 working keys: https://github.com/nlitsme/b3603/network https://hackaday.io/project/4362-power-supply-b3603-alternative-firmware 
Specification
Input voltage: 6V ~ 40V backup existing flashpi@rpi2 ~/stm8flash $ sudo ./stm8flash -c stlinkv2 -p stm8s003f3 -s eeprom -r b3606/eeprom.bin action = 1Determine EEPROM area Reading 128 bytes at 0x4000... OK Bytes received: 128 pi@rpi2 ~/stm8flash $ sudo ./stm8flash -c stlinkv2 -p stm8s003f3 -s flash -r b3606/flash.bin action = 1Determine FLASH area Reading 8192 bytes at 0x8000... OK Bytes received: 8192 pi@rpi2 ~/stm8flash $ sudo ./stm8flash -c stlinkv2 -p stm8s003f3 -s ram -r b3606/ram.bin action = 1Determine RAM area Reading 1024 bytes at 0x0... OK Bytes received: 1024 unprotect stm8 using stm8flashhttps://github.com/vdudouyt/stm8flash/issues/38#issuecomment-195123081 $ echo "00" | xxd -r -p >ROP_CLEAR.bin $ stm8flash -c stlinkv2 -p stm8s103f3 -s opt -w ROP_CLEAR.bin compilepi@rpi2 ~ $ git clone https://github.com/swegener/b3603 Cloning into 'b3603'... remote: Counting objects: 1109, done. remote: Total 1109 (delta 0), reused 0 (delta 0), pack-reus Receiving objects: 100% (1109/1109), 11.04 MiB | 2.90 MiB/s Resolving deltas: 100% (770/770), done. Checking connectivity... done. pi@rpi2 ~/b3603/stm8 $ sudo apt-get install sdcc pi@rpi2 ~/b3603/stm8 $ make Code fits the flash, it is 7930 dpavlin@nuc:/nuc/b3603/stm8$ uname -a Linux nuc 4.4.0-1-amd64 #1 SMP Debian 4.4.6-1 (2016-03-17) x86_64 GNU/Linux dpavlin@nuc:/nuc/b3603/stm8$ sdcc -v SDCC : mcs51/z80/z180/r2k/r3ka/gbz80/tlcs90/ds390/TININative/ds400/hc08/s08/stm8 3.5.0 #9253 (Mar 21 2016) (Linux) published under GNU General Public License (GPL) dpavlin@nuc:/nuc/b3603/stm8$ scp b3603.ihx rpi2:stm8flash/ flashpi@rpi2 ~/stm8flash $ sudo ./stm8flash -c stlinkv2 -p stm8s003f3 -w ./b3603.ihx action = 2Determine FLASH area Writing Intel hex file 8160 bytes at 0x8000... Tries exceeded # unprotect flash pi@rpi2 ~/stm8flash $ echo "00" | xxd -r -p >ROP_CLEAR.bin pi@rpi2 ~/stm8flash $ sudo ./stm8flash -c stlinkv2 -p stm8s003f3 -s opt -w ROP_CLEAR.bin action = 2Determine OPT area Writing binary file 1 bytes at 0x4800... OK Bytes written: 1 # serialdpavlin@x200:/x200/stm8$ microcom -p /dev/ttyUSB0 -s 38400 connected to /dev/ttyUSB0 Escape character: Ctrl-\ Type the escape character followed by c to get to the menu or q to quit B3603 starting: Version 1.0.1 pi@rpi2 ~/b3603/stm8 $ cat ~/b3603.sh #!/bin/sh -x microcom -s 38400 -p /dev/serial/by-path/platform-3f980000.usb-usb-0\:1.5.1\:1.0-port0 calibrate
dpavlin@cubieboard:/mnt/nuc/b3603/stm8$ git diff ./calibrate.py
diff --git a/stm8/calibrate.py b/stm8/calibrate.py
index f94f866..313e1f6 100755
--- a/stm8/calibrate.py
+++ b/stm8/calibrate.py
@@ -153,7 +153,8 @@ class Multimeter(object):
         return self._sample() != None

     def _sample(self):
-        p = os.popen('sigrok-cli -d %s:conn=%s --samples 1' % (self.model, self.portname))
+        print('## sigrok-cli -d %s:conn=%s --samples 1' % (self.model, self.portname))
+        p = os.popen('sigrok-cli -d %s:conn=%s --samples 1 -O analog' % (self.model, self.portname))
         s = p.read()
         p.close()
         return float(s.split(' ')[1])
@@ -214,9 +215,9 @@ def calibration_voltage(auto):
         return

     if auto == True:
-        dmm = Multimeter(sys.argv[3], sys.argv[4])
+        dmm = Multimeter(sys.argv[4], sys.argv[5])
         if not dmm.open():
-            print 'Failed to open serial port to multimeter on serial %s model %s' % (sys.argv[3], sys.argv[4])
+            print 'Failed to open serial port to multimeter on serial %s model %s' % (sys.argv[4], sys.argv[5])
             psu.close()
             return


dpavlin@cubieboard:/mnt/nuc/b3603/stm8$ ./calibrate.py -a voltage /dev/ttyUSB0 /dev/ttyUSB1 uni-t-ut61e-s
er
OPEN "M: B3603"
## sigrok-cli -d uni-t-ut61e-ser:conn=/dev/ttyUSB1 --samples 1
PSU Input voltage is 11305.0 mV, will use 10 steps between 10 mV and 4000 mV
0 . Setting voltage to 10 mV
## sigrok-cli -d uni-t-ut61e-ser:conn=/dev/ttyUSB1 --samples 1
## sigrok-cli -d uni-t-ut61e-ser:conn=/dev/ttyUSB1 --samples 1
## sigrok-cli -d uni-t-ut61e-ser:conn=/dev/ttyUSB1 --samples 1
Multimeter samples vary too much, stddev=0.244349, data: [1.2358, 0.8785, 0.6413]
Failed to read stable value, trying again, maybe
## sigrok-cli -d uni-t-ut61e-ser:conn=/dev/ttyUSB1 --samples 1
## sigrok-cli -d uni-t-ut61e-ser:conn=/dev/ttyUSB1 --samples 1
## sigrok-cli -d uni-t-ut61e-ser:conn=/dev/ttyUSB1 --samples 1
Step 0 Set voltage 10.000000 mV Read voltage 0.273667 mV PWM 114.0 ADC 132.0 (0.149)
1 . Setting voltage to 409 mV
## sigrok-cli -d uni-t-ut61e-ser:conn=/dev/ttyUSB1 --samples 1
## sigrok-cli -d uni-t-ut61e-ser:conn=/dev/ttyUSB1 --samples 1
## sigrok-cli -d uni-t-ut61e-ser:conn=/dev/ttyUSB1 --samples 1
Step 1 Set voltage 409.000000 mV Read voltage 0.403467 mV PWM 185.0 ADC 172.0 (0.377)
2 . Setting voltage to 808 mV
## sigrok-cli -d uni-t-ut61e-ser:conn=/dev/ttyUSB1 --samples 1
## sigrok-cli -d uni-t-ut61e-ser:conn=/dev/ttyUSB1 --samples 1
## sigrok-cli -d uni-t-ut61e-ser:conn=/dev/ttyUSB1 --samples 1
Step 2 Set voltage 808.000000 mV Read voltage 0.807800 mV PWM 257.0 ADC 244.0 (0.772)
3 . Setting voltage to 1207 mV
## sigrok-cli -d uni-t-ut61e-ser:conn=/dev/ttyUSB1 --samples 1
## sigrok-cli -d uni-t-ut61e-ser:conn=/dev/ttyUSB1 --samples 1
## sigrok-cli -d uni-t-ut61e-ser:conn=/dev/ttyUSB1 --samples 1
Step 3 Set voltage 1207.000000 mV Read voltage 1.212667 mV PWM 329.0 ADC 316.0 (1.179)
4 . Setting voltage to 1606 mV
## sigrok-cli -d uni-t-ut61e-ser:conn=/dev/ttyUSB1 --samples 1
## sigrok-cli -d uni-t-ut61e-ser:conn=/dev/ttyUSB1 --samples 1
## sigrok-cli -d uni-t-ut61e-ser:conn=/dev/ttyUSB1 --samples 1
Step 4 Set voltage 1606.000000 mV Read voltage 1.617200 mV PWM 401.0 ADC 387.0 (1.574)
5 . Setting voltage to 2005 mV
## sigrok-cli -d uni-t-ut61e-ser:conn=/dev/ttyUSB1 --samples 1
## sigrok-cli -d uni-t-ut61e-ser:conn=/dev/ttyUSB1 --samples 1
## sigrok-cli -d uni-t-ut61e-ser:conn=/dev/ttyUSB1 --samples 1
Step 5 Set voltage 2005.000000 mV Read voltage 2.022333 mV PWM 473.0 ADC 459.0 (1.975)
6 . Setting voltage to 2404 mV
## sigrok-cli -d uni-t-ut61e-ser:conn=/dev/ttyUSB1 --samples 1
## sigrok-cli -d uni-t-ut61e-ser:conn=/dev/ttyUSB1 --samples 1
## sigrok-cli -d uni-t-ut61e-ser:conn=/dev/ttyUSB1 --samples 1
Step 6 Set voltage 2404.000000 mV Read voltage 2.425333 mV PWM 545.0 ADC 531.0 (2.376)
7 . Setting voltage to 2803 mV
## sigrok-cli -d uni-t-ut61e-ser:conn=/dev/ttyUSB1 --samples 1
## sigrok-cli -d uni-t-ut61e-ser:conn=/dev/ttyUSB1 --samples 1
## sigrok-cli -d uni-t-ut61e-ser:conn=/dev/ttyUSB1 --samples 1
Step 7 Set voltage 2803.000000 mV Read voltage 2.829333 mV PWM 617.0 ADC 603.0 (2.782)
8 . Setting voltage to 3202 mV
## sigrok-cli -d uni-t-ut61e-ser:conn=/dev/ttyUSB1 --samples 1
## sigrok-cli -d uni-t-ut61e-ser:conn=/dev/ttyUSB1 --samples 1
## sigrok-cli -d uni-t-ut61e-ser:conn=/dev/ttyUSB1 --samples 1
Step 8 Set voltage 3202.000000 mV Read voltage 3.232000 mV PWM 689.0 ADC 675.0 (3.178)
9 . Setting voltage to 3601 mV
## sigrok-cli -d uni-t-ut61e-ser:conn=/dev/ttyUSB1 --samples 1
## sigrok-cli -d uni-t-ut61e-ser:conn=/dev/ttyUSB1 --samples 1
## sigrok-cli -d uni-t-ut61e-ser:conn=/dev/ttyUSB1 --samples 1
Step 9 Set voltage 3601.000000 mV Read voltage 3.635667 mV PWM 761.0 ADC 747.0 (3.579)
['OK', '']
ADC
(0.005373500905021045, -0.8923354860819778) 352 58480
['OK', '']
PWM
(179.88709677419354, 185.25806451612908) 11789080 12141072
['OK', '']
PostmarketOShttps://wiki.postmarketos.org/wiki/Google_Nexus_5_(lg-hammerhead) dpavlin@klin:/klin/postmarketos$ git clone https://gitlab.com/postmarketOS/pmbootstrap dpavlin@klin:/klin/postmarketos$ cd pmbootstrap/ dpavlin@klin:/klin/postmarketos/pmbootstrap$ ./pmbootstrap.py init # ./pmbootstrap.py install --no-fde 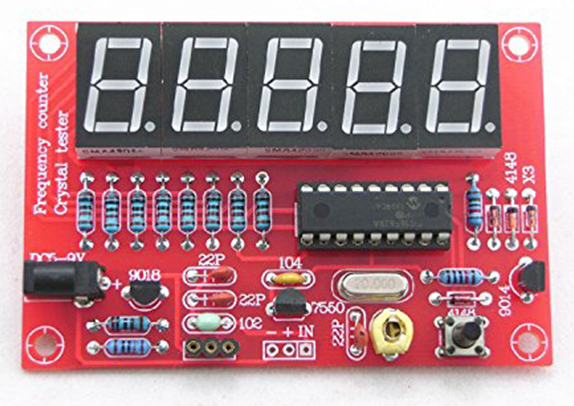 Cheap frequency counter kit "1Hz-50MHz Digital LED DIY Kits Crystal Oscillator Frequency Counter Tester" original designhttps://www.qsl.net/dl4yhf/freq_counter/freq_counter.html modifications
x200 tablethttps://libreboot.org/docs/install/x200_external.html
root@x200:~# dmidecode | grep ROM\ Size
        ROM Size: 8192 kB

root@x200:~# ifconfig eth0
eth0: flags=4098<BROADCAST,MULTICAST>  mtu 1500
        ether 00:1f:16:0c:2a:41  txqueuelen 1000  (Ethernet)
https://operand.ca/2018/02/22/liberating-a-x200.html x230 tablethttps://www.coreboot.org/Board:lenovo/x230 https://www.ericholzbach.net/blog/x230_coreboot/ https://blog.noq2.net/corebooting-thinkpad-x230.html http://zmatt.net/unlocking-my-lenovo-laptop-part-3/ XPE, VGA bios https://vimeo.com/177951809 https://mega.nz/#!PVxz2ZgS!u9ivPW3Hio3kGKcmBHsBLwlUpRe3n74NHQK-Gzgzt08 x230.dmi.afterx230.dmi.before EChttps://github.com/eigenmatt/mec-tools flashrompi@rpi3:~ $ sudo apt-get install build-essential pciutils usbutils libpci-dev libusb-dev libftdi1 libftdi-dev zlib1g-dev MEhttps://github.com/corna/me_cleaner beforedpavlin@x230:/x200/x230/coreboot/util/intelmetool$ sudo ./intelmetool -s Bad news, you have a `QM77 Express Chipset LPC Controller` so you have ME hardware on board and you can't control or disable it, continuing... MEI not hidden on PCI, checking if visible MEI found: [8086:1e3a] 8;� ME Status : 0x1e000245 ME Status 2 : 0x60000106 ME: FW Partition Table : OK ME: Bringup Loader Failure : NO ME: Firmware Init Complete : YES ME: Manufacturing Mode : NO ME: Boot Options Present : NO ME: Update In Progress : NO ME: Current Working State : Normal ME: Current Operation State : M0 with UMA ME: Current Operation Mode : Normal ME: Error Code : No Error ME: Progress Phase : Host Communication ME: Power Management Event : Clean Moff->Mx wake ME: Progress Phase State : Host communication established ME: Extend SHA-256: 72ac4092d50568edb998066d81033da5f626bf97fe7f9942d06247dbf59bf8db ME: timeout waiting for data: expected 8, available 0 ME: GET FW VERSION message failed ME Capability: Full Network manageability : OFF ME Capability: Regular Network manageability : OFF ME Capability: Manageability : ON ME Capability: Small business technology : ON ME Capability: Level III manageability : OFF ME Capability: IntelR Anti-Theft (AT) : ON ME Capability: IntelR Capability Licensing Service (CLS) : ON ME Capability: IntelR Power Sharing Technology (MPC) : ON ME Capability: ICC Over Clocking : ON ME Capability: Protected Audio Video Path (PAVP) : ON ME Capability: IPV6 : OFF ME Capability: KVM Remote Control (KVM) : OFF ME Capability: Outbreak Containment Heuristic (OCH) : OFF ME Capability: Virtual LAN (VLAN) : ON ME Capability: TLS : ON ME Capability: Wireless LAN (WLAN) : OFF Intel SSD died
smartctl 6.6 2017-11-05 r4594 [x86_64-linux-4.19.0-4-amd64] (local build)
Copyright (C) 2002-17, Bruce Allen, Christian Franke, www.smartmontools.org

=== START OF INFORMATION SECTION ===
Device Model:     INTEL SSDSA2BW160G3H
Serial Number:    BAD_CTX     00000136
LU WWN Device Id: 5 001517 a6be8caac
Firmware Version: 4PC10365
User Capacity:    8,388,608 bytes [8.38 MB]
Sector Size:      512 bytes logical/physical
Rotation Rate:    Solid State Device
Device is:        Not in smartctl database [for details use: -P showall]
ATA Version is:   ATA8-ACS T13/1699-D revision 4
SATA Version is:  SATA 2.6, 3.0 Gb/s
Local Time is:    Sat Apr 27 17:23:39 2019 CEST
SMART support is: Unavailable - device lacks SMART capability.

=== START OF ENABLE/DISABLE COMMANDS SECTION ===
SMART Enable failed: scsi error badly formed scsi parameters

A mandatory SMART command failed: exiting. To continue, add one or more '-T permissive' options.


dpavlin@x200:~$ sudo hdparm -i /dev/sdc

/dev/sdc:

 Model=INTEL SSDSA2BW160G3H, FwRev=4PC10365, SerialNo=BAD_CTX     00000136
 Config={ Fixed }
 RawCHS=16383/16/63, TrkSize=0, SectSize=0, ECCbytes=0
 BuffType=unknown, BuffSize=unknown, MaxMultSect=16, MultSect=1
 CurCHS=16/16/63, CurSects=16128, LBA=yes, LBAsects=16384
 IORDY=on/off, tPIO={min:120,w/IORDY:120}, tDMA={min:120,rec:120}
 PIO modes:  pio0 pio3 pio4
 DMA modes:  mdma0 mdma1 mdma2
 UDMA modes: udma0 udma1 udma2 udma3 udma4 udma5 *udma6
 AdvancedPM=no WriteCache=enabled
 Drive conforms to: unknown:  ATA/ATAPI-2,3,4,5,6,7

 * signifies the current active mode

dpavlin@x200:~/intel-ssd$ sudo smartctl -a /dev/sdc > smartctl.1
dpavlin@x200:~/intel-ssd$ sudo hdparm -i /dev/sdc > hdparm-i.1
dpavlin@x200:~/intel-ssd$ sudo hdparm -I /dev/sdc > hdparm-I.1
Internet visdom is that it's corrupted translation table and that secure erase or firmware update might help. secure erasehttps://ata.wiki.kernel.org/index.php/ATA_Secure_Erase
dpavlin@x200:~/intel-ssd$ sudo hdparm -I /dev/sdc | grep frozen
        not     frozen

# ok

root@x200:/home/dpavlin/intel-ssd# hdparm --user-master u --security-set-pass Eins /dev/sdc
security_password: "Eins"

/dev/sdc:
 Issuing SECURITY_SET_PASS command, password="Eins", user=user, mode=high

root@x200:/home/dpavlin/intel-ssd# hdparm -I /dev/sdc | grep -C 3 enabled
Security:
        Master password revision code = 65534
                supported
                enabled
        not     locked
        not     frozen
        not     expired: security count

root@x200:/home/dpavlin/intel-ssd# time hdparm --user-master u --security-erase Eins /dev/sdc
security_password: "Eins"

/dev/sdc:
 Issuing SECURITY_ERASE command, password="Eins", user=user

real    0m19.285s
user    0m0.001s
sys     0m0.004s
This I assume reseted traslation table on ssd. First invocation of smartctl complained that I have to use -s on to turn smart on, so I did. And it seems to work. All smart counters are reset (beacuse smart was off after secure erase).
dpavlin@tab:~$ sudo smartctl -a /dev/sda  | head -20
smartctl 6.6 2016-05-31 r4324 [x86_64-linux-4.9.0-8-amd64] (local build)
Copyright (C) 2002-16, Bruce Allen, Christian Franke, www.smartmontools.org

=== START OF INFORMATION SECTION ===
Device Model:     INTEL SSDSA2BW160G3H
Serial Number:    BTPR144501A5160DGN
LU WWN Device Id: 5 001517 a6be8caac
Firmware Version: 4PC10365
User Capacity:    160,041,885,696 bytes [160 GB]
Sector Size:      512 bytes logical/physical
Rotation Rate:    Solid State Device
Device is:        Not in smartctl database [for details use: -P showall]
ATA Version is:   ATA8-ACS T13/1699-D revision 4
SATA Version is:  SATA 2.6, 3.0 Gb/s
Local Time is:    Tue Apr 30 21:48:39 2019 CEST
SMART support is: Available - device has SMART capability.
SMART support is: Enabled

=== START OF READ SMART DATA SECTION ===
SMART overall-health self-assessment test result: PASSED

dpavlin@tab:~$ sudo hdparm -i /dev/sda

/dev/sda:

 Model=INTEL SSDSA2BW160G3H, FwRev=4PC10365, SerialNo=BTPR144501A5160DGN
 Config={ Fixed }
 RawCHS=16383/16/63, TrkSize=0, SectSize=0, ECCbytes=0
 BuffType=unknown, BuffSize=unknown, MaxMultSect=16, MultSect=1
 CurCHS=16383/16/63, CurSects=16514064, LBA=yes, LBAsects=312581808
 IORDY=on/off, tPIO={min:120,w/IORDY:120}, tDMA={min:120,rec:120}
 PIO modes:  pio0 pio3 pio4
 DMA modes:  mdma0 mdma1 mdma2
 UDMA modes: udma0 udma1 udma2 udma3 udma4 udma5 *udma6
 AdvancedPM=no WriteCache=enabled
 Drive conforms to: unknown:  ATA/ATAPI-2,3,4,5,6,7

 * signifies the current active mode

dpavlin@tab:~$ sudo hdparm -tT /dev/sda

/dev/sda:
 Timing cached reads:   9340 MB in  2.00 seconds = 4675.95 MB/sec
 Timing buffered disk reads: 736 MB in  3.01 seconds = 244.74 MB/sec
firmware updatehttps://blog.cihar.com/archives/2012/07/13/intel-ssd-firmware-update-linux/ But modified for recent Debian kernels https://downloadcenter.intel.com/download/28749/Intel-SSD-Firmware-Update-Tool?v=t dpavlin@x200:~$ unzip FirmwareUpdateTool_v3_0_7.zip -d FirmwareUpdateTool_v3_0_7 dpavlin@x200:~/FirmwareUpdateTool_v3_0_7$ sudo apt install grub-imageboot dpavlin@x200:~/FirmwareUpdateTool_v3_0_7$ cat /etc/default/grub-imageboot # Where to find the iso/floppy images IMAGES="/boot/images" # You can override the boot options for iso/floppy images here # see http://syslinux.zytor.com/wiki/index.php/MEMDISK for details #IMAGEOPTS="rawimg" #ISOOPTS="iso" dpavlin@x200:~/FirmwareUpdateTool_v3_0_7$ . /etc/default/grub-imageboot ; sudo mkdir -v $IMAGES mkdir: created directory '/boot/images' dpavlin@x200:~/FirmwareUpdateTool_v3_0_7$ sudo cp -v issdfut_64_3.0.7.iso /boot/images/ 'issdfut_64_3.0.7.iso' -> '/boot/images/issdfut_64_3.0.7.iso' dpavlin@x200:~/FirmwareUpdateTool_v3_0_7$ sudo update-grub Generating grub configuration file ... Found linux image: /boot/vmlinuz-4.19.0-4-amd64 Found initrd image: /boot/initrd.img-4.19.0-4-amd64 Found linux image: /boot/vmlinuz-4.19.0-2-amd64 Found initrd image: /boot/initrd.img-4.19.0-2-amd64 Found memdisk: /boot/memdisk Found iso image: /boot/images/issdfut_64_3.0.7.iso done This doesn't boot on x200 dual-core for me. board markingsDifferent to board on this page, mine has following markings:
HYS-01-008_V3.4 boot loader modeShort GPIO0 and GND during boot to enter flash mode before connecting to the serial programmer. The power indicator LED will be strong red to confirm the device has entered this mode. As soon as the short is removed, the red color will be dimmed. The device will then be ready for flashing. Sonoff-Tasmotahttps://github.com/arendst/Sonoff-Tasmota/wiki/BlitzWolf-SHP2 configurationdpavlin@nuc:/nuc/esp8266/Sonoff-Tasmota/sonoff$ cp user_config_override_sample.h user_config_override.h # edit user_config_override.h to define wifi and mqtt i also added: #undef MODULE #define MODULE BLITZWOLF_BWSHP #undef USE_DOMOTICZ #undef USE_HOME_ASSISTANT builddpavlin@nuc:/nuc/esp8266/Sonoff-Tasmota$ export PLATFORMIO_BUILD_FLAGS='-DUSE_CONFIG_OVERRIDE' dpavlin@nuc:/nuc/esp8266/Sonoff-Tasmota$ platformio run -e sonoff flashroot@x200:/mnt/nuc/esptool# ./esptool.py --chip esp8266 --port /dev/ttyUSB0 --before no_reset --after no_reset erase_flash esptool.py v2.7-dev Serial port /dev/ttyUSB0 Connecting... Chip is ESP8266EX Features: WiFi MAC: 80:7d:3a:4e:32:97 Uploading stub... Running stub... Stub running... Erasing flash (this may take a while)... Chip erase completed successfully in 1.3s Staying in bootloader. root@x200:/mnt/nuc/esptool# ./esptool.py --chip esp8266 --port /dev/ttyUSB0 --before no_reset --after no_reset write_flash --flash_mode dout 0x00000 /mnt/nuc/esp8266/Sonoff-Tasmota/.pioenvs/sonoff/firmware.bin esptool.py v2.7-dev Serial port /dev/ttyUSB0 Connecting.... Chip is ESP8266EX Features: WiFi MAC: 80:7d:3a:4e:32:97 Uploading stub... Running stub... Stub running... Configuring flash size... Auto-detected Flash size: 1MB Compressed 519456 bytes to 358637... Wrote 519456 bytes (358637 compressed) at 0x00000000 in 31.7 seconds (effective 131.1 kbit/s)... Hash of data verified. Leaving... Staying in bootloader. espurina - DON"T USE IT!https://github.com/xoseperez/espurna/wiki/Hardware-BLITZWOLF-BW-SHP2 TL;DR -- it doesn't work for me at all -- it reboots when I access web page and doesn't send data over mqtt or influxdb reliably. I can't recommend it at all, but I'm leaving my attempts below.... download pre-compiled binary and flash ithttps://github.com/xoseperez/espurna/releases/tag/1.13.5 root@x200:/mnt/nuc/esptool# wget https://github.com/xoseperez/espurna/releases/download/1.13.5/espurna-1.13.5-blitzwolf-bwshpx.bin root@x200:/mnt/nuc/esptool# ./esptool.py --chip esp8266 --port /dev/ttyUSB0 erase_flash esptool.py v2.7-dev Serial port /dev/ttyUSB0 Connecting.... Chip is ESP8266EX Features: WiFi MAC: 80:7d:3a:4e:32:97 Uploading stub... Running stub... Stub running... Erasing flash (this may take a while)... Chip erase completed successfully in 1.3s Staying in bootloader. # again power cycle device with gpio connected to ground, and disconnect it.... root@x200:/mnt/nuc/esptool# ./esptool.py --chip esp8266 --port /dev/ttyUSB0 write_flash --flash_mode dout 0x00000 ./espurna-1.13.5-blitzwolf-bwshpx.bin esptool.py v2.7-dev Serial port /dev/ttyUSB0 Connecting.... Chip is ESP8266EX Features: WiFi MAC: 80:7d:3a:4e:32:97 Uploading stub... Running stub... Stub running... Configuring flash size... Auto-detected Flash size: 1MB Compressed 492880 bytes to 352587... Wrote 492880 bytes (352587 compressed) at 0x00000000 in 31.2 seconds (effective 126.5 kbit/s)... Hash of data verified. Leaving... Staying in bootloader. configurationhttps://github.com/xoseperez/espurna/wiki/Configuration connect to first boot AP When asked for credentials, enter "admin" as username and "fibonacci" as password. I configured mqtt and start pushing data using telegraf to influxdb. json doesn't work with telegraf. ota updatehttps://github.com/xoseperez/espurna/wiki/OTA dpavlin@nuc:/nuc/esp8266/espurna/code$ git remote -v origin https://github.com/xoseperez/espurna (fetch) origin https://github.com/xoseperez/espurna (push) dpavlin@nuc:/nuc/esp8266/espurna/code$ platformio run -e blitzwolf-bwshpx-ota
for some rason, updateing using web interface browse/upload did work for me first time, but not after that. ota managerhttps://github.com/xoseperez/espurna/wiki/Espurna-OTA-Manager Does not work for me. platformio otadpavlin@nuc:/nuc/esp8266/espurna/code$ ESPURNA_IP=192.168.3.103 platformio run -t upload -e blitzwolf-bwshpx-ota -v Hints for usage: play without delayffplay -fflags nobuffer /dev/video1 # works for network streams, not for /dev/video ffplay -probesize 32 -sync ext http://192.168.3.248/VIDEO.CGI ffplay -fflags nobuffer -flags low_delay -framedrop \ -strict experimental -rtsp_transport tcp rtsp://<host>:<port> 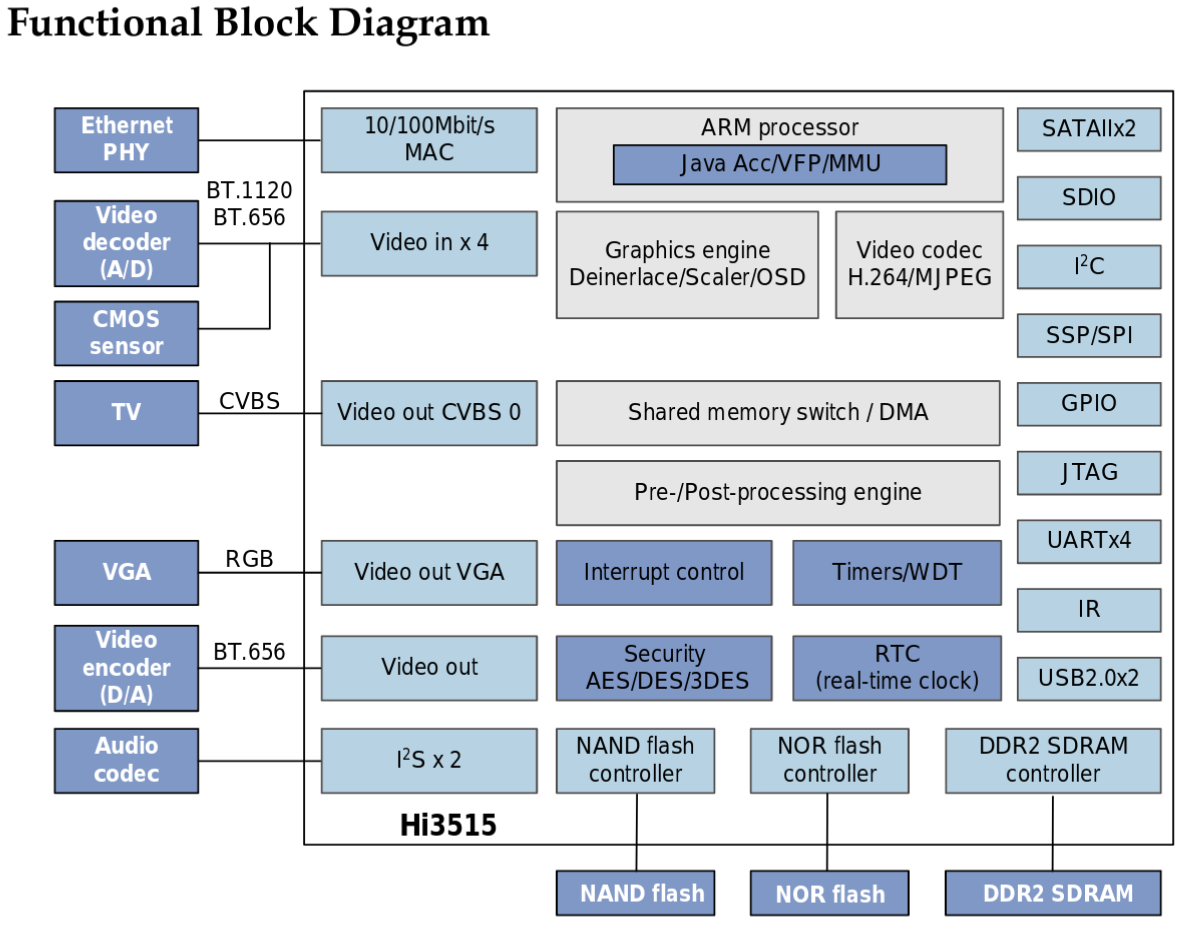 hi3515v100.pdf Hi3515Hi3515 H.264 Encoding and Decoding Processor Key FeaturesCPU Core
zARM926EJ Video Encoding/Decodingz
H.264 main profile encoding/decoding serialEN-6704V 4 channel H.264 digital video recorder for @RadionaOrg has 3.3V uart with pinout GND, TX, RX, 5V mozilla-ktdvr-plugin en-6704v j87 +--- ---+ |1 2 3 4| +-------+ 1 - gnd 2 - 2.29 3 - 3.3 4 - 5v 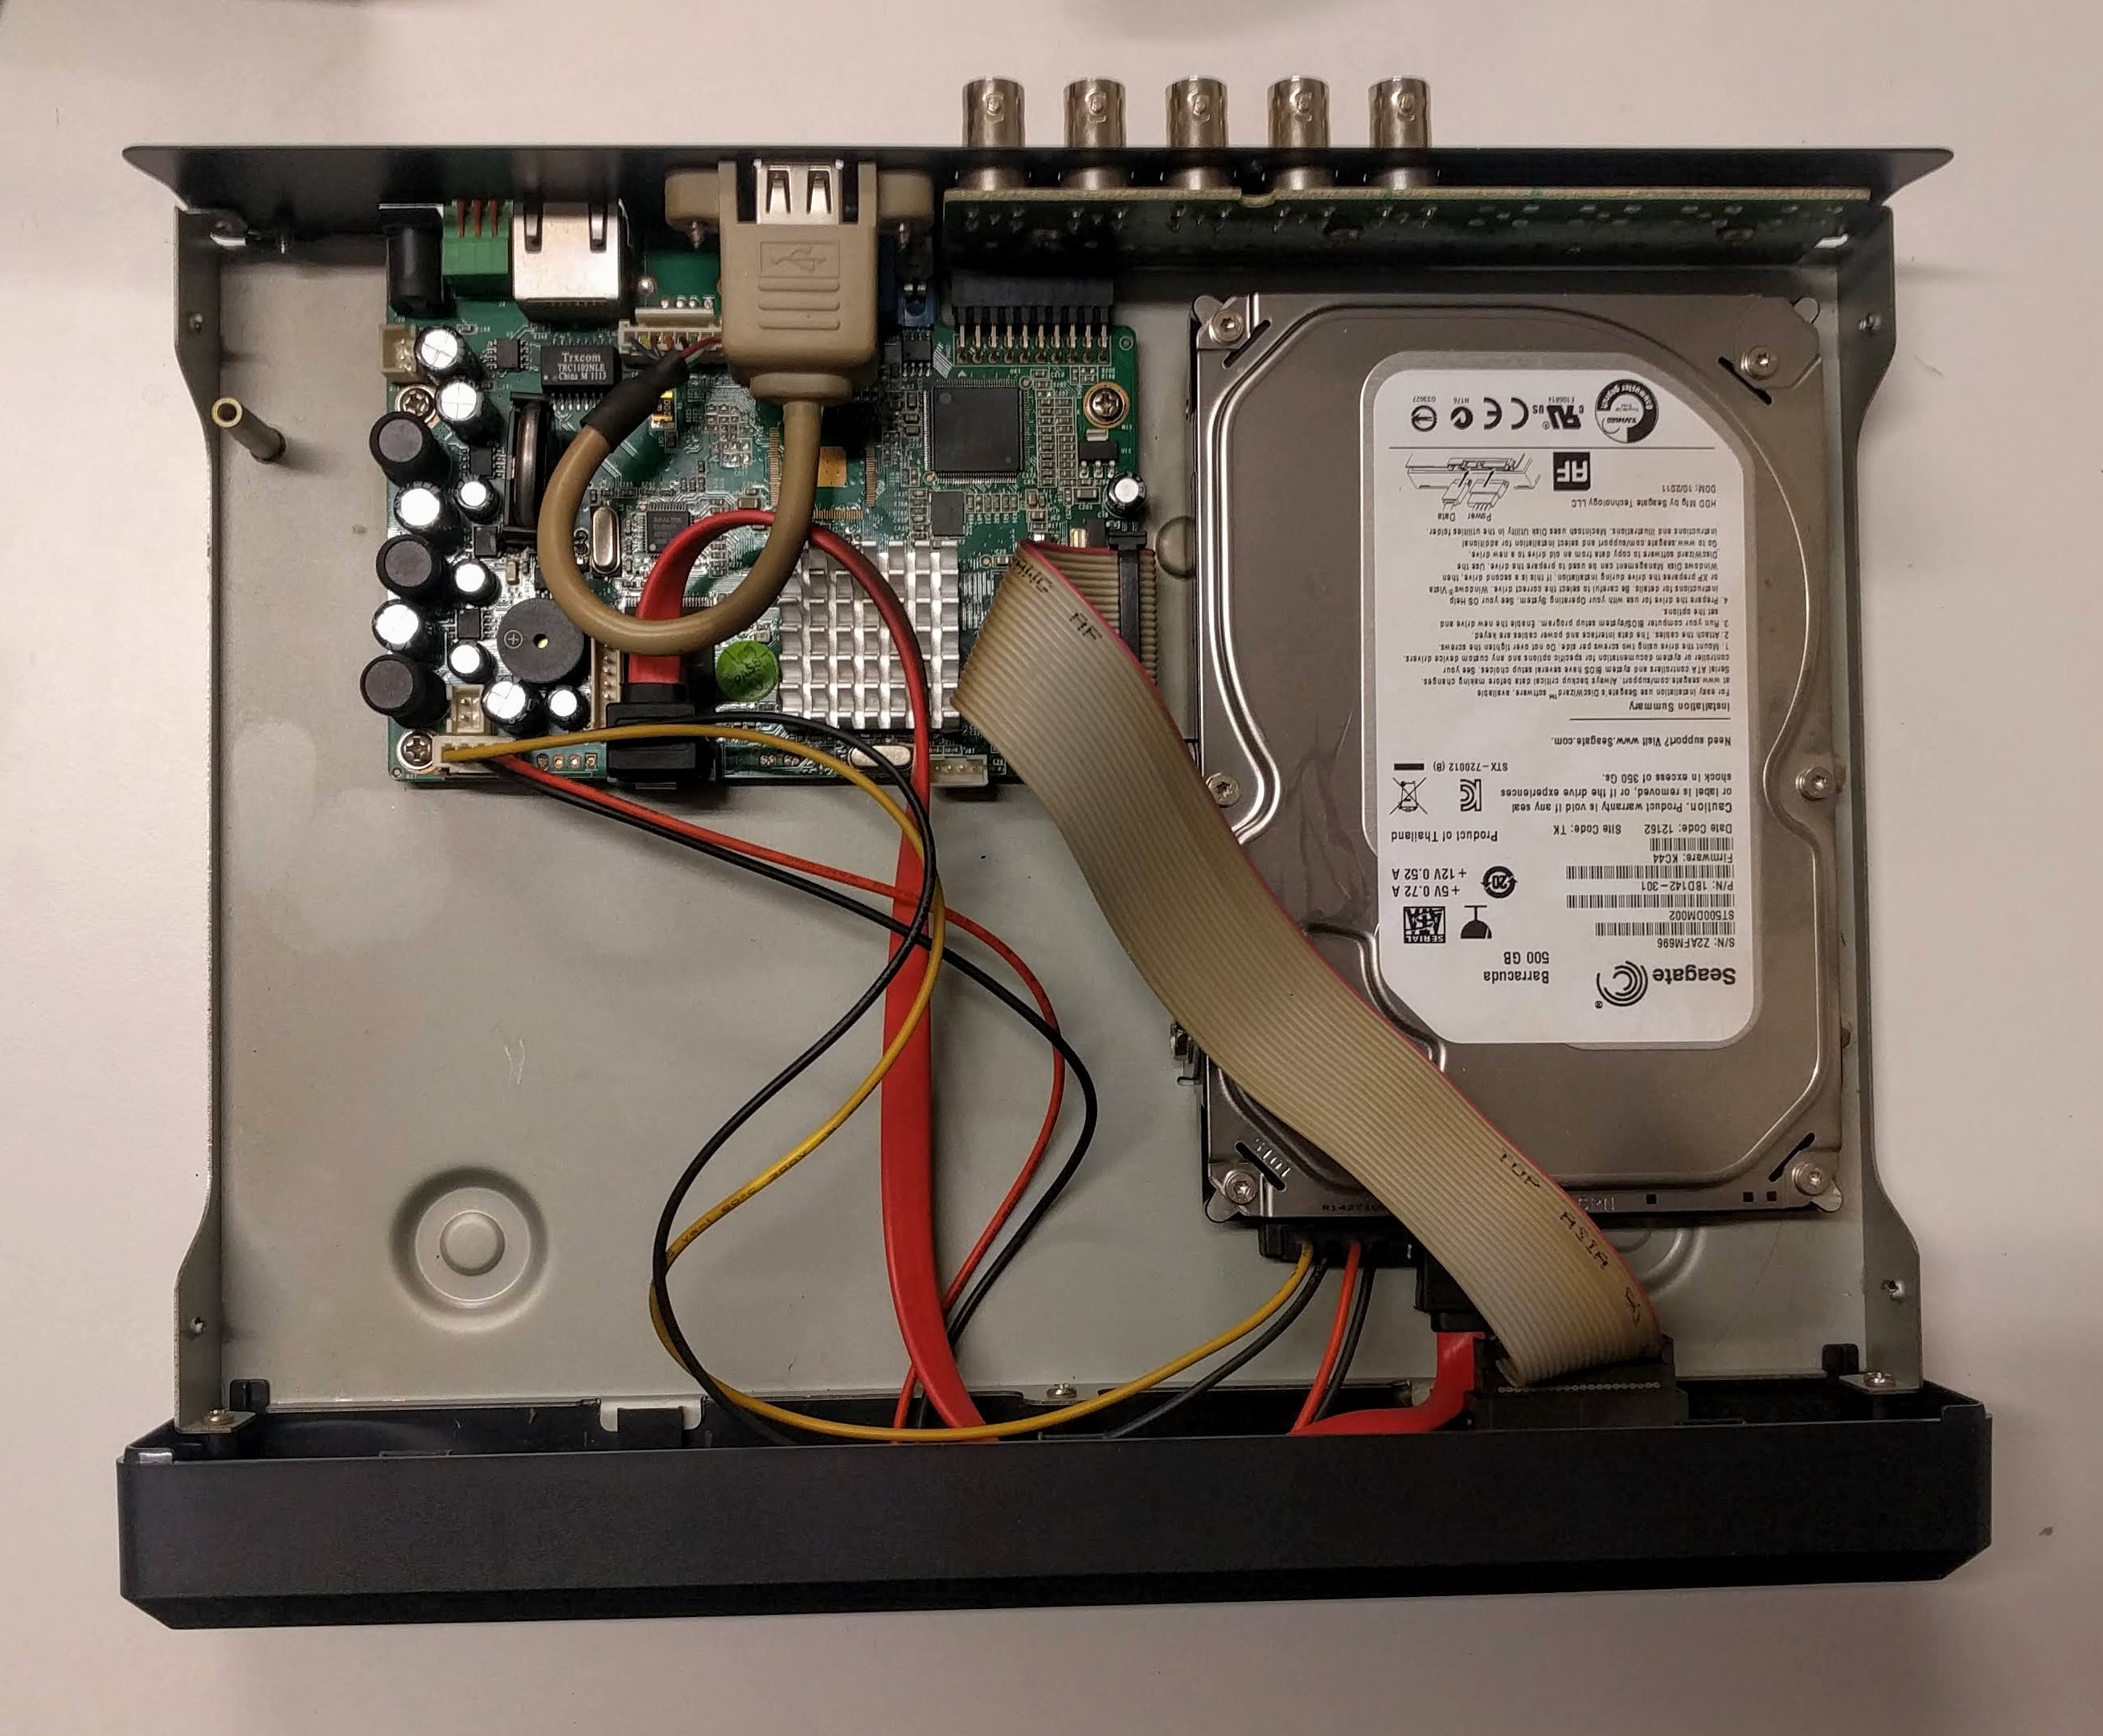 hi3515v100 linkshttp://www.i-1.nl/blog/wp-content/uploads/CCF-paper-Forensic-reliabilty-DVR.pdf https://openhisiipcam.org/hardware/briefs/hi3515v100.pdf SDKhttps://github.com/bluhbluh/Hi3515-SDK dpavlin@nuc:/nuc/hi3515v100$ git clone https://github.com/bluhbluh/Hi3515-SDK Cloning into 'Hi3515-SDK'... remote: Enumerating objects: 362, done. remote: Counting objects: 100% (362/362), done. remote: Compressing objects: 100% (312/312), done. remote: Total 362 (delta 45), reused 362 (delta 45), pack-reused 0 Receiving objects: 100% (362/362), 277.99 MiB | 5.77 MiB/s, done. Resolving deltas: 100% (45/45), done. Checking out files: 100% (336/336), done. mtd/stm/disk/0/p1/mtd-backup $ ls -al /dev/mtdblock* brw-rw---- 1 root root 31, 0 Jan 1 1970 /dev/mtdblock0 brw-rw---- 1 root root 31, 1 Jan 1 1970 /dev/mtdblock1 brw-rw---- 1 root root 31, 2 Jan 1 1970 /dev/mtdblock2 brw-rw---- 1 root root 31, 3 Mar 23 00:31 /dev/mtdblock3 /stm/disk/0/p1/mtd-backup $ dd if=/dev/mtdblock0 of=0 bs=128k 32+0 records in 32+0 records out /stm/disk/0/p1/mtd-backup $ ls -al drwxr-xr-x 2 root root 4096 Mar 23 02:06 . drwxr-xr-x 25 root root 4096 Mar 23 02:06 .. -rw-r--r-- 1 root root 4194304 Mar 23 02:06 0 /stm/disk/0/p1/mtd-backup $ dd if=/dev/mtdblock1 of=1 bs=128k 96+0 records in 96+0 records out /stm/disk/0/p1/mtd-backup $ dd if=/dev/mtdblock2 of=2 bs=128k 112+0 records in 112+0 records out /stm/disk/0/p1/mtd-backup $ dd if=/dev/mtdblock3 of=3 bs=128k 16+0 records in 16+0 records out setup tftp writable serverdpavlin@x200:/mnt/nuc/hi3515v100$ cat /etc/default/tftpd-hpa # /etc/default/tftpd-hpa TFTP_USERNAME="tft" TFTP_DIRECTORY="/srv/tftp" TFTP_ADDRESS="192.168.1.1:69" TFTP_OPTIONS="--secure --create" backup/stm/disk/0/p1/mtd-backup $ tftp -p -l 0 -r /0 192.168.1.1 /stm/disk/0/p1/mtd-backup $ tftp -p -l 1 -r /1 192.168.1.1 /stm/disk/0/p1/mtd-backup $ tftp -p -l 2 -r /2 192.168.1.1 /stm/disk/0/p1/mtd-backup $ tftp -p -l 3 -r /3 192.168.1.1 tar+nc backupon device/mnt $ tar -cv -f - . | nc 192.168.1.1 8888 on receiving sidedpavlin@x200:/mnt/nuc/hi3515v100/mnt-backup$ nc -l -p 8888 | tee mnt.tar | tar tvf - Nice verbose output during backup on both sides and nc is much faster than tftp. |
Weblog Archives
|