|
Dobrica Pavlinušić's random unstructured stuff
RaspberryPi
mount-rpi-image.sh
Interestring projectsTODO: test them out and write full description on this wiki :-)
development
OV7670DHT11/DHT22
BlinkM + i2cCEC - control your TVhttp://www.raspberrypi.org/forum/viewtopic.php?f=35&t=15749 root@raspberrypi:/home/pi# git clone https://github.com/Pulse-Eight/libcec.git root@raspberrypi:/home/pi# cd libcec/ root@raspberrypi:/home/pi/libcec# apt-get install autoconf automake libtool liblockdev1-dev libudev-dev libraspberrypi-dev root@raspberrypi:/home/pi/libcec# sh -x bootstrap root@raspberrypi:/home/pi/libcec# ./configure --with-rpi-include-path=/opt/vc/include/ --with-rpi-lib-path=/opt/vc/lib/ ############################################################################## libCEC version 2:1:0 configured Compilation flags: CXXFLAGS : -g -O2 -fPIC -Wall -Wextra -Wno-missing-field-initializers -Wno-psabi libCEC LDFLAGS : -lbcm_host -llockdev -lrt -ldl -lpthread -L/opt/vc/lib/ -lvcos -lvchiq_arm -ludev client LDFLAGS : -lrt -ldl -lpthread Configured features: Pulse-Eight CEC Adapter : yes Pulse-Eight CEC Adapter detection : yes Raspberry Pi support : yes TDA995x support : no You can now build libCEC by running: make ############################################################################## make install TV onpi@raspberrypi ~ $ echo "on 0" | cec-client -s Hints from forumscreen saverhttp://www.raspberrypi.org/phpBB3/viewtopic.php?p=84831#p84831 # prevent screensaver from powering down display setterm -blank 0 -powerdown 0 > /dev/tty0 # clear the display and turn off the flashing cursor clear > /dev/tty0 setterm -cursor 0 > /dev/tty0 # turn the cursor back on when done with omxplayer setterm -cursor 1 > /dev/tty0 YouTube transcoding in VLChttp://www.raspberrypi.org/phpBB3/viewtopic.php?p=163658#p163658
cvlc 'youtube.com/watch?v=XXXXXXXXXX' :sout='#transcode{vcodec=h264,vb=0,fps=0,scale=0,height=720,acodec=mp4a,ab=128,channels=2,samplerate=44100}:http{mux=ffmpeg{mux=flv},dst=:8080/youtube}' :sout-keep
Education materials
Raspberry Pi Accessories Starter Kithttp://www.conrad.com/ce/en/product/409208/Raspberry-Pi-Accessories-Starter-Kit?ref=searchDetail
GPU
Arduino
JTAGArduino ProMini 3.3V 8MHzDisable serial port consoleedit /boot/cmdline.txt and remove all ttyAMA0 leaving: pi@raspberrypi ~ $ cat /boot/cmdline.txt dwc_otg.lpm_enable=0 console=tty1 root=/dev/mmcblk0p2 rootfstype=ext4 elevator=deadline rootwait bcm2708.w1_gpio_pin=4 also, comment out ttyAMA0 in /etc/inittab connect Arduino serial
RX->TX https://github.com/dpavlin/avrdude-rpi/tree/fix_channel_in_use pin definitions in GPIO.RPi are physical pins on board not BCM or wiring ip!  flasing
dpavlin@blue:~/Arduino/RF433_Sockets$ scp /tmp/build*.tmp/*.hex pi@rpi.tv:/tmp/
RF433_Sockets.cpp.hex                                        100%   19KB  18.6KB/s   00:00

pi@raspberrypi ~ $ cat avrdude.sh
#!/bin/sh
hex=`ls -t /tmp/*.hex | head -1`
echo "flash hex: $hex"
sudo /home/pi/avrdude-rpi/avrdude-autoreset -C /home/pi/avrdude.conf -v -v -patmega328p -carduino -P/dev/ttyAMA0 -b57600 -D -Uflash:w:$hex:i

pi@raspberrypi ~ $ ./avrdude.sh
flash hex: /tmp/RF433_Sockets.cpp.hex

avrdude: Version 6.1, compiled on Sep 17 2014 at 05:41:35
         Copyright (c) 2000-2005 Brian Dean, http://www.bdmicro.com/
         Copyright (c) 2007-2014 Joerg Wunsch

         System wide configuration file is "/home/pi/avrdude.conf"
         User configuration file is "/root/.avrduderc"
         User configuration file does not exist or is not a regular file, skipping

         Using Port                    : /dev/ttyAMA0
         Using Programmer              : arduino
         Overriding Baud Rate          : 57600
done with autoreset
strace: |/home/pi/avrdude-rpi/autoreset: Broken pipe
strace: |/home/pi/avrdude-rpi/autoreset: Broken pipe
         AVR Part                      : ATmega328P
         Chip Erase delay              : 9000 us
         PAGEL                         : PD7
         BS2                           : PC2
         RESET disposition             : dedicated
         RETRY pulse                   : SCK
         serial program mode           : yes
         parallel program mode         : yes
         Timeout                       : 200
         StabDelay                     : 100
         CmdexeDelay                   : 25
         SyncLoops                     : 32
         ByteDelay                     : 0
         PollIndex                     : 3
         PollValue                     : 0x53
         Memory Detail                 :

                                  Block Poll               Page                       Polled
           Memory Type Mode Delay Size  Indx Paged  Size   Size #Pages MinW  MaxW   ReadBack
           ----------- ---- ----- ----- ---- ------ ------ ---- ------ ----- ----- ---------
           eeprom        65    20     4    0 no       1024    4      0  3600  3600 0xff 0xff
           flash         65     6   128    0 yes     32768  128    256  4500  4500 0xff 0xff
           lfuse          0     0     0    0 no          1    0      0  4500  4500 0x00 0x00
           hfuse          0     0     0    0 no          1    0      0  4500  4500 0x00 0x00
           efuse          0     0     0    0 no          1    0      0  4500  4500 0x00 0x00
           lock           0     0     0    0 no          1    0      0  4500  4500 0x00 0x00
           calibration    0     0     0    0 no          1    0      0     0     0 0x00 0x00
           signature      0     0     0    0 no          3    0      0     0     0 0x00 0x00

         Programmer Type : Arduino
         Description     : Arduino
         Hardware Version: 2
         Firmware Version: 1.16
         Vtarget         : 0.0 V
         Varef           : 0.0 V
         Oscillator      : Off
         SCK period      : 0.1 us

avrdude: AVR device initialized and ready to accept instructions

Reading | ################################################## | 100% 0.01s

avrdude: Device signature = 0x1e950f
avrdude: safemode: lfuse reads as 0
avrdude: safemode: hfuse reads as 0
avrdude: safemode: efuse reads as 0
avrdude: reading input file "/tmp/RF433_Sockets.cpp.hex"
avrdude: writing flash (6770 bytes):

Writing | ################################################## | 100% 1.98s

avrdude: 6770 bytes of flash written
avrdude: verifying flash memory against /tmp/RF433_Sockets.cpp.hex:
avrdude: load data flash data from input file /tmp/RF433_Sockets.cpp.hex:
avrdude: input file /tmp/RF433_Sockets.cpp.hex contains 6770 bytes
avrdude: reading on-chip flash data:

Reading | ################################################## | 100% 1.49s

avrdude: verifying ...
avrdude: 6770 bytes of flash verified

avrdude: safemode: lfuse reads as 0
avrdude: safemode: hfuse reads as 0
avrdude: safemode: efuse reads as 0
avrdude: safemode: Fuses OK (E:00, H:00, L:00)
strace: |/home/pi/avrdude-rpi/autoreset: Broken pipe
strace: |/home/pi/avrdude-rpi/autoreset: Broken pipe
strace: |/home/pi/avrdude-rpi/autoreset: Broken pipe
strace: |/home/pi/avrdude-rpi/autoreset: Broken pipe
strace: |/home/pi/avrdude-rpi/autoreset: Broken pipe

avrdude done.  Thank you.

strace: |/home/pi/avrdude-rpi/autoreset: Broken pipe
DS1307 Tiny RTC
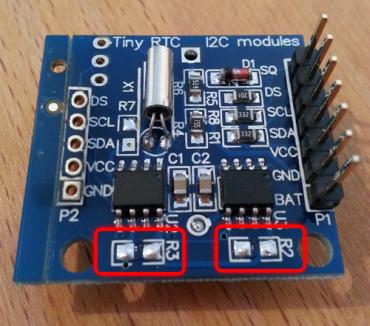
Check if module has 5V pull-up I2C resistors! If it does (like Tiny RTC has R2 and R3) you will have to remove them. 
root@raspberrypi:/home/pi# apt-get install i2c-tools

root@raspberrypi:/home/pi# modprobe i2c-dev

root@raspberrypi:/home/pi# i2cdetect -y 1
     0  1  2  3  4  5  6  7  8  9  a  b  c  d  e  f
00:          -- -- -- -- -- -- -- -- -- -- -- -- --
10: -- -- -- -- -- -- -- -- -- -- -- -- -- -- -- --
20: -- -- -- -- -- -- -- -- -- -- -- -- -- -- -- --
30: -- -- -- -- -- -- -- -- -- -- -- -- -- -- -- --
40: -- -- -- -- -- -- -- -- -- -- -- -- -- -- -- --
50: 50 -- -- -- -- -- -- -- -- -- -- -- -- -- -- --
60: -- -- -- -- -- -- -- -- 68 -- -- -- -- -- -- --
70: -- -- -- -- -- -- -- --

root@raspberrypi:/home/pi# modprobe rtc-ds1307

root@raspberrypi:/home/pi# echo ds1307 0x68 > /sys/class/i2c-adapter/i2c-1/new_device

root@raspberrypi:/home/pi# hwclock --systohc -D --noadjfile --utc
hwclock from util-linux 2.20.1
Using /dev interface to clock.
Assuming hardware clock is kept in UTC time.
Time elapsed since reference time has been 0.722720 seconds.
Delaying further to reach the new time.
Setting Hardware Clock to 11:53:41 = 1429876421 seconds since 1969
ioctl(RTC_SET_TIME) was successful.
DS18B20root@raspberrypi:/home/pi# grep w1 /boot/config.txt dtoverlay=w1-gpio # reboot root@raspberrypi:/home/pi# cat /sys/bus/w1/devices/28-0000043c5507/w1_slave 50 05 4b 46 7f ff 0c 10 1c : crc=1c YES 50 05 4b 46 7f ff 0c 10 1c t=85000 Hmm, you will also want to remove R1 pullup to make it work? avrdudeUsing Raspberry Pi as Arduino ISP programmer root@raspberrypi:/home/pi# avrdude -c linuxgpio -p atmega328p avrdude: AVR device initialized and ready to accept instructions Reading | ################################################## | 100% 0.00s avrdude: Device signature = 0x1e950f avrdude: safemode: Fuses OK (E:05, H:DA, L:FF) avrdude done. Thank you. logic analyzer
rotary encoderhttp://www.bobrathbone.com/raspberrypi_rotary.htm SWD
http://www.disk91.com/2015/technology/programming/swd-programming-using-a-raspberrypi/ pi@raspberrypi ~ $ git clone https://github.com/disk91/PySWD pi@raspberrypi ~ $ cd PySWD/ PIC
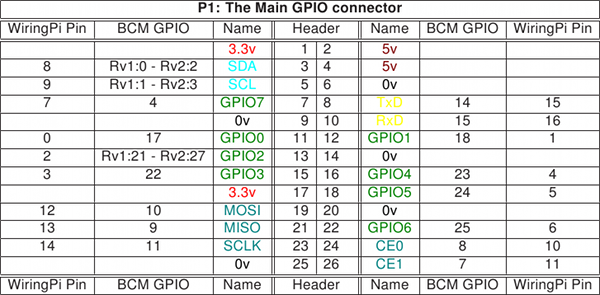
esp8089PS/2 GPIOGPIO header annotationsSignal generatorpi@rpi2 ~/WsprryPi $ sudo ./wspr --test-tone 1000000 A test tone will be generated at frequency 1.000000 MHz Using local mbox device file with major 249. Transmitting test tone on frequency 1.000000 MHz Press CTRL-C to exit! LCD panelshttp://blog.reasonablycorrect.com/raw-dpi-raspberry-pi/ Pi Zero USB OTGlibcomposite PATA IDE emulationDPI LCD screen
i2c clock stretching |

