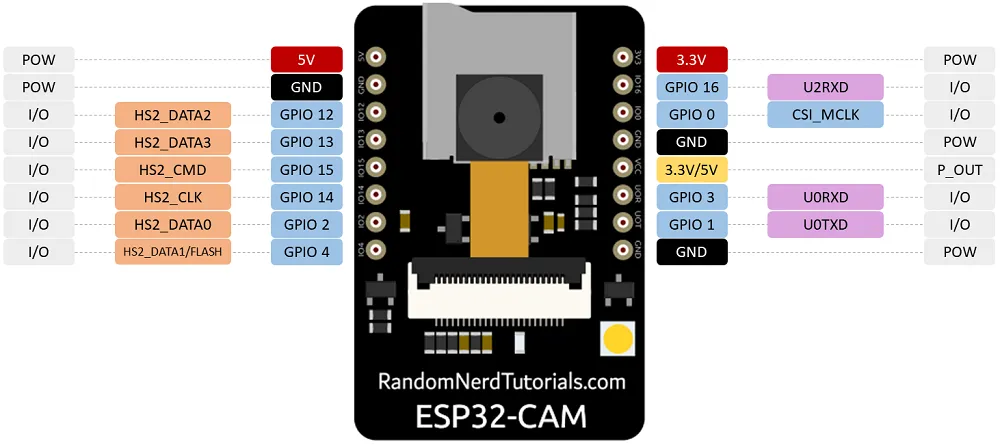
https://github.com/raphaelbs/esp32-cam-ai-thinker/blob/master/docs/about-esp32-cam.md
connection, flashing
connected to pl2303 serial
| pl2303 | esp32cam |
| 3v3 | not connected |
| rxd | UnR |
| rxd | UOT |
| gnd | GND |
| 5v | 5V |

To program the board, I userd jumper to jump GPIO0 with GND pin next to it.
improved example app
https://github.com/easytarget/esp32-cam-webserver
   cp myconfig.sample.h myconfig.h
   vi myconfig.h
dpavlin@nuc:/nuc/esp32/esp32-cam-webserver$ platformio run

dpavlin@nuc:/nuc/esp32/esp32-cam-webserver$ pio run -t upload --upload-port /dev/ttyUSB2
"/home/dpavlin/.platformio/penv/bin/python" "/home/dpavlin/.platformio/packages/tool-esptoolpy/esptool.py" \
--chip esp32 --port "/dev/ttyUSB3" --baud 460800 --before default_reset --after hard_reset \
write_flash -z --flash_mode dio --flash_freq 40m --flash_size detect \
0x1000 /home/dpavlin/.platformio/packages/framework-arduinoespressif32/tools/sdk/bin/bootloader_dio_40m.bin \
0x8000 /nuc/esp32/esp32-cam-webserver/.pio/build/esp32cam/partitions.bin \
0xe000 /home/dpavlin/.platformio/packages/framework-arduinoespressif32/tools/partitions/boot_app0.bin \
0x10000 .pio/build/esp32cam/firmware.bin
timelapse
ocr on device
https://github.com/jomjol/AI-on-the-edge-device
https://github.com/jomjol/AI-on-the-edge-device/wiki/Installation
Remove glue from lens (very hard, using sharp knife), and rotate lens by 45 degrees until
picture is sharp (I had to use pliers to do this).
dpavlin@nuc:/nuc/esp32/AI-on-the-edge-device$ vi sd-card/wlan.ini

dpavlin@nuc:/nuc/esp32/AI-on-the-edge-device/code$ pio run

dpavlin@nuc:/nuc/esp32/AI-on-the-edge-device/code$ pio run -v -t upload --upload-port /dev/ttyUSB3

"/home/dpavlin/.platformio/penv/bin/python" "/home/dpavlin/.platformio/packages/tool-esptoolpy/esptool.py" \
--chip esp32 --port "/dev/ttyUSB3" --baud 460800 --before default_reset --after hard_reset \
write_flash -z --flash_mode dio --flash_freq 40m --flash_size detect \
0x1000 /nuc/esp32/AI-on-the-edge-device/code/.pio/build/esp32cam/bootloader.bin \
0x8000 /nuc/esp32/AI-on-the-edge-device/code/.pio/build/esp32cam/partitions.bin \
0xd000 /nuc/esp32/AI-on-the-edge-device/code/.pio/build/esp32cam/ota_data_initial.bin \
0x10000 .pio/build/esp32cam/firmware.bin

# original flashing instructions
esptool write_flash 0x01000 bootloader.bin 0x08000 partitions.bin 0x10000 firmware.bin

# download raw picture
wget 192.168.3.112/img_tmp/raw.jpg
old, obsolete problems
It seems that my module is usually known as AI thinker variant. It has terrible picture which starts with huge green bias.
It also doesn't work for me in resolutions below 1024x768 (in current esp32 example as of 2019-08-02).
Plugging it into external 5V power supply did not helped much.
To solve green tint, I just left esp32cam module plugged in whole day and night. I guess that image sensor got discharged during night, but next day picture was fine.
Problem with image resolution was fixed by updating to more recent version of ESP32 support for Arduino (as of 2020-04-20 it works fine)
