|
Weblog: recent changes


in Dobrica Pavlinušić's random unstructured stuff
|
|
|
https://altbier.us/ch552g/Intro_to_the_CH552G_Microcontroller.pdf RGB micropad 3 keys 1 rotary encoderRGB micropad with three buttons and rotary encoder based on CH552G https://github.com/eccherda/ch552g_mini_keyboard/ https://hackaday.io/project/189914-rgb-macropad-custom-firmware https://github.com/biemster/3keys_1knob fork with hid sending (which somehow doesn't work) https://github.com/mgrenonville/3keys_1knob/tree/serial fork with ability to send sequence of keys (with different eeprom config) https://github.com/MrGeorgeK55/Macropad-3-keys-1-knob flashing toolshttps://github.com/MarsTechHAN/ch552tool https://github.com/rgwan/librech551 https://github.com/frank-zago/isp55e0 - can read and write flash data usb original[Thu Dec 12 11:24:45 2024] usb 3-3.3.4.4: new full-speed USB device number 28 using xhci_hcd [Thu Dec 12 11:24:45 2024] usb 3-3.3.4.4: New USB device found, idVendor=1189, idProduct=8890, bcdDevice= 0.00 [Thu Dec 12 11:24:45 2024] usb 3-3.3.4.4: New USB device strings: Mfr=0, Product=0, SerialNumber=0 [Thu Dec 12 11:24:45 2024] input: HID 1189:8890 as /devices/pci0000:00/0000:00:14.0/usb3/3-3/3-3.3/3-3.3.4/3-3.3.4.4/3-3.3.4.4:1.0/0003:1189:8890.0022/input/input70 [Thu Dec 12 11:24:46 2024] hid-generic 0003:1189:8890.0022: input,hidraw6: USB HID v1.11 Keyboard [HID 1189:8890] on usb-0000:00:14.0-3.3.4.4/input0 [Thu Dec 12 11:24:46 2024] usbhid 3-3.3.4.4:1.1: couldn't find an input interrupt endpoint [Thu Dec 12 11:24:46 2024] input: HID 1189:8890 Keyboard as /devices/pci0000:00/0000:00:14.0/usb3/3-3/3-3.3/3-3.3.4/3-3.3.4.4/3-3.3.4.4:1.2/0003:1189:8890.0023/input/input71 [Thu Dec 12 11:24:46 2024] hid-generic 0003:1189:8890.0023: input,hidraw7: USB HID v1.00 Keyboard [HID 1189:8890] on usb-0000:00:14.0-3.3.4.4/input2 [Thu Dec 12 11:24:46 2024] input: HID 1189:8890 as /devices/pci0000:00/0000:00:14.0/usb3/3-3/3-3.3/3-3.3.4/3-3.3.4.4/3-3.3.4.4:1.3/0003:1189:8890.0024/input/input72 [Thu Dec 12 11:24:46 2024] hid-generic 0003:1189:8890.0024: input,hidraw8: USB HID v1.10 Mouse [HID 1189:8890] on usb-0000:00:14.0-3.3.4.4/input3 after shoring unpopulated pad on bottom of board and plugging back in to enter bootloader mode [Thu Dec 12 11:31:40 2024] usb 3-3.3.4.4: new full-speed USB device number 29 using xhci_hcd [Thu Dec 12 11:31:40 2024] usb 3-3.3.4.4: New USB device found, idVendor=4348, idProduct=55e0, bcdDevice= 2.40 [Thu Dec 12 11:31:40 2024] usb 3-3.3.4.4: New USB device strings: Mfr=0, Product=0, SerialNumber=0 ArduinoAfter compiling and flashing doesn't work with error because of permissions to device in bootloader mode. Re-run flashing command with sudo: dpavlin@nuc:~$ sudo /home/dpavlin/.arduino15/packages/CH55xDuino/tools/MCS51Tools/2023.10.10/linux/vnproch55x -r 2 -t CH552 -c 3 /tmp/arduino_build_734169/ch552g_mini_keyboard.ino.hex ------------------------------------------------------------------ CH55x Programmer by Deqing Updated on: 2023/10/10 ------------------------------------------------------------------ usbRertySeconds 2 target: CH552 config bytes: 3 Load file as hex Loaded 12673 bytes between: 0000 to 31CE DeviceVersion of CH55x: 2.40 MCU ID: 52 11 Found Device CH552 Bootloader: 2.4.0 ID: 4E 8F 51 BC XOR Mask: EA EA EA EA EA EA EA 3C Write 12751 bytes from bin file. .................................................. Write complete!!! Verify chip .................................................. Verify complete!!! ------------------------------------------------------------------ Reset OK dpavlin@nuc:~$ [Thu Dec 12 11:36:59 2024] usb 3-3.3.4.4: USB disconnect, device number 29 [Thu Dec 12 11:36:59 2024] usb 3-3.3.4.4: new full-speed USB device number 30 using xhci_hcd [Thu Dec 12 11:36:59 2024] usb 3-3.3.4.4: New USB device found, idVendor=1209, idProduct=c55d, bcdDevice= 1.00 [Thu Dec 12 11:36:59 2024] usb 3-3.3.4.4: New USB device strings: Mfr=1, Product=2, SerialNumber=3 [Thu Dec 12 11:36:59 2024] usb 3-3.3.4.4: Product: CH55xduino [Thu Dec 12 11:36:59 2024] usb 3-3.3.4.4: Manufacturer: Deqing [Thu Dec 12 11:36:59 2024] usb 3-3.3.4.4: SerialNumber: CH55x kbd mos [Thu Dec 12 11:36:59 2024] input: Deqing CH55xduino Keyboard as /devices/pci0000:00/0000:00:14.0/usb3/3-3/3-3.3/3-3.3.4/3-3.3.4.4/3-3.3.4.4:1.0/0003:1209:C55D.0025/input/input73 [Thu Dec 12 11:36:59 2024] input: Deqing CH55xduino Mouse as /devices/pci0000:00/0000:00:14.0/usb3/3-3/3-3.3/3-3.3.4/3-3.3.4.4/3-3.3.4.4:1.0/0003:1209:C55D.0025/input/input74 [Thu Dec 12 11:36:59 2024] hid-generic 0003:1209:C55D.0025: input,hidraw6: USB HID v1.10 Keyboard [Deqing CH55xduino] on usb-0000:00:14.0-3.3.4.4/input0 [Thu Dec 12 14:40:42 2024] input: WH-1000XM5 (AVRCP) as /devices/virtual/input/input75 better yet, copy udev rules dpavlin@nuc:~/.arduino15/packages/CH55xDuino/tools/MCS51Tools/2023.10.10$ sudo cp -v linux/99-ch55xbl.rules /etc/udev/rules.d/ 'linux/99-ch55xbl.rules' -> '/etc/udev/rules.d/99-ch55xbl.rules' root@nuc:~# udevadm control --reload-rules && udevadm trigger  https://www.home-assistant.io/integrations/zengge/ -- doesn't work https://github.com/home-assistant/core/issues/124083 -- LEDnetWF BLE seems to work But changing settings in home assistant bricked device. Fix it by shorting button pins on board. https://play.google.com/store/apps/details?id=com.zengge.blev2 08:65:F0:62:19:5c  See also Ikea zigbee VINDRIKTNINGair quality sensor https://github.com/dzurishome/esphome-ikea-vindriktning Control LEDS https://github.com/Hypfer/esp8266-vindriktning-particle-sensor/issues/18 infohttps://hackaday.com/2020/12/08/exploring-custom-firmware-on-xiaomi-thermometers/ https://github.com/atc1441/ATC_MiThermometer https://github.com/pvvx/ATC_MiThermometer Xiaomi Smart LCD Screen Digital Thermometer 2 Mijia Bluetooth Temperature Humidity Sensor Moisture Meter Mijia App https://www.aliexpress.com/item/1005002401046796.html LYWSD03MMC decode using gatttoolroot@rpi2:/home/pi# sudo hcitool lescan LE Scan ... A4:C1:38:D8:3F:9C ATC_D83F9C open source firmwarehttps://github.com/bentolor/xiaomi-mijia-bluetooth-firmware simple shell to send reading to influxhttps://github.com/dpavlin/air-quality/blob/master/ble-mijia.sh https://github.com/dpavlin/air-quality/blob/master/system/ble-mijia%40.service https://www.youtube.com/watch?v=NXKzFG61lNs Home Assistantconnected to home assistant using https://esphome.github.io/bluetooth-proxies/ get bindkey using https://atc1441.github.io/TelinkFlasher.html https://esphome.io/components/sensor/xiaomi_ble.html?highlight=xiaomi_ble#obtaining-the-bindkey
[core-ssh ~]$ tail -18 config/.storage/core.config_entries
      {
        "entry_id": "574243c45c4485523ec174e18cfcf1ad",
        "version": 1,
        "domain": "xiaomi_ble",
        "title": "Temperature/Humidity Sensor DC63 (LYWSD03MMC)",
        "data": {
          "bindkey": "a6da0c1d99200efe9c9afb8fd9a534ef"
        },
        "options": {},
        "pref_disable_new_entities": false,
        "pref_disable_polling": false,
        "source": "bluetooth",
        "unique_id": "A4:C1:38:90:DC:63",
        "disabled_by": null
      }
    ]
  }
flash new firmware to sensor https://github.com/pvvx/ATC_MiThermometer
open in chrome on android to flash firmware, flashing serial port
pinout
DTR - 3V3 (so that reset works) https://pvvx.github.io/ATC_MiThermometer/USBCOMFlashTx.html https://github.com/pvvx/TlsrComSwireWriter reed switchhttps://github.com/pvvx/ATC_MiThermometer?tab=readme-ov-file#reed-switch-or-button-functions It is possible to solder a reed switch on the LYWSD03MMC board to the pins marked "P8" (GPIO PA6) and GND. eBUS Adapter Shield v5
https://adapter.ebusd.eu/v5/index.en.html old links
See also: Vaillant and Vaillant serial https://github.com/raphaelbs/esp32-cam-ai-thinker/blob/master/docs/about-esp32-cam.md connection, flashingconnected to pl2303 serial
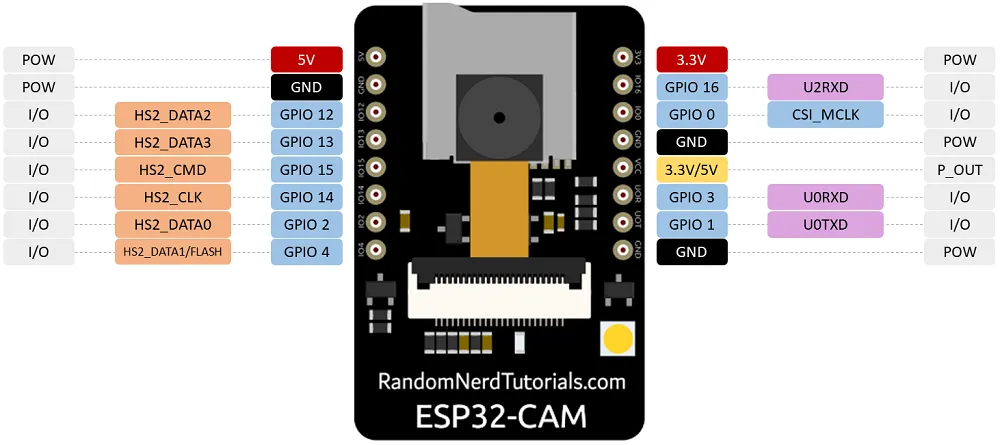 To program the board, I userd jumper to jump GPIO0 with GND pin next to it. https://github.com/raphaelbs/esp32-cam-ai-thinker/blob/master/docs/esp32cam-pin-notes.md spiSDI = IO12 SDO = IO13 SCK = IO14 CS = IO15 improved example apphttps://github.com/easytarget/esp32-cam-webserver cp myconfig.sample.h myconfig.h vi myconfig.h dpavlin@nuc:/nuc/esp32/esp32-cam-webserver$ platformio run dpavlin@nuc:/nuc/esp32/esp32-cam-webserver$ pio run -t upload --upload-port /dev/ttyUSB2 "/home/dpavlin/.platformio/penv/bin/python" "/home/dpavlin/.platformio/packages/tool-esptoolpy/esptool.py" \ --chip esp32 --port "/dev/ttyUSB3" --baud 460800 --before default_reset --after hard_reset \ write_flash -z --flash_mode dio --flash_freq 40m --flash_size detect \ 0x1000 /home/dpavlin/.platformio/packages/framework-arduinoespressif32/tools/sdk/bin/bootloader_dio_40m.bin \ 0x8000 /nuc/esp32/esp32-cam-webserver/.pio/build/esp32cam/partitions.bin \ 0xe000 /home/dpavlin/.platformio/packages/framework-arduinoespressif32/tools/partitions/boot_app0.bin \ 0x10000 .pio/build/esp32cam/firmware.bin timelapseocr on devicehttps://github.com/jomjol/AI-on-the-edge-device https://github.com/jomjol/AI-on-the-edge-device/wiki/Installation
Remove glue from lens (very hard, using sharp knife), and rotate lens by 45 degrees until dpavlin@nuc:/nuc/esp32/AI-on-the-edge-device$ vi sd-card/wlan.ini dpavlin@nuc:/nuc/esp32/AI-on-the-edge-device/code$ pio run dpavlin@nuc:/nuc/esp32/AI-on-the-edge-device/code$ pio run -v -t upload --upload-port /dev/ttyUSB3 "/home/dpavlin/.platformio/penv/bin/python" "/home/dpavlin/.platformio/packages/tool-esptoolpy/esptool.py" \ --chip esp32 --port "/dev/ttyUSB3" --baud 460800 --before default_reset --after hard_reset \ write_flash -z --flash_mode dio --flash_freq 40m --flash_size detect \ 0x1000 /nuc/esp32/AI-on-the-edge-device/code/.pio/build/esp32cam/bootloader.bin \ 0x8000 /nuc/esp32/AI-on-the-edge-device/code/.pio/build/esp32cam/partitions.bin \ 0xd000 /nuc/esp32/AI-on-the-edge-device/code/.pio/build/esp32cam/ota_data_initial.bin \ 0x10000 .pio/build/esp32cam/firmware.bin # original flashing instructions esptool write_flash 0x01000 bootloader.bin 0x08000 partitions.bin 0x10000 firmware.bin # download raw picture wget 192.168.3.112/img_tmp/raw.jpg old, obsolete problemsIt seems that my module is usually known as AI thinker variant. It has terrible picture which starts with huge green bias. It also doesn't work for me in resolutions below 1024x768 (in current esp32 example as of 2019-08-02). Plugging it into external 5V power supply did not helped much. To solve green tint, I just left esp32cam module plugged in whole day and night. I guess that image sensor got discharged during night, but next day picture was fine. Problem with image resolution was fixed by updating to more recent version of ESP32 support for Arduino (as of 2020-04-20 it works fine) Home Assistanthttps://jamesachambers.com/cheap-esp32-cam-home-assistant-esphome-camera-guide/
esphome:
  name: esp32cam
  friendly_name: esp32cam

esp32:
  board: esp32cam
  framework:
    type: arduino

# Enable logging
logger:
  level: VERBOSE
  tx_buffer_size: 256

# Enable Home Assistant API
api:
  encryption:
    key: "MsJJJiDv9FTjZ1w8dfoy3Z8cQWjGOsk0m4Wgge0B+8w="
  services:  # change camera parameters on-the-fly
  - service: camera_set_param
    variables:
      name: string
      value: int
    then:
      - lambda: |-
          bool state_return = false;
          if (("contrast" == name) && (value >= -2) && (value <= 2)) { id(espcam).set_contrast(value); state_return = true; }
          if (("brightness" == name) && (value >= -2) && (value <= 2)) { id(espcam).set_brightness(value); state_return = true; }
          if (("saturation" == name) && (value >= -2) && (value <= 2)) { id(espcam).set_saturation(value); state_return = true; }
          if (("special_effect" == name) && (value >= 0U) && (value <= 6U)) { id(espcam).set_special_effect((esphome::esp32_camera::ESP32SpecialEffect)value); state_return = true; }
          if (("aec_mode" == name) && (value >= 0U) && (value <= 1U)) { id(espcam).set_aec_mode((esphome::esp32_camera::ESP32GainControlMode)value); state_return = true; }
          if (("aec2" == name) && (value >= 0U) && (value <= 1U)) { id(espcam).set_aec2(value); state_return = true; }
          if (("ae_level" == name) && (value >= -2) && (value <= 2)) { id(espcam).set_ae_level(value); state_return = true; }
          if (("aec_value" == name) && (value >= 0U) && (value <= 1200U)) { id(espcam).set_aec_value(value); state_return = true; }
          if (("agc_mode" == name) && (value >= 0U) && (value <= 1U)) { id(espcam).set_agc_mode((esphome::esp32_camera::ESP32GainControlMode)value); state_return = true; }
          if (("agc_value" == name) && (value >= 0U) && (value <= 30U)) { id(espcam).set_agc_value(value); state_return = true; }
          if (("agc_gain_ceiling" == name) && (value >= 0U) && (value <= 6U)) { id(espcam).set_agc_gain_ceiling((esphome::esp32_camera::ESP32AgcGainCeiling)value); state_return = true; }
          if (("wb_mode" == name) && (value >= 0U) && (value <= 4U)) { id(espcam).set_wb_mode((esphome::esp32_camera::ESP32WhiteBalanceMode)value); state_return = true; }
          if (("test_pattern" == name) && (value >= 0U) && (value <= 1U)) { id(espcam).set_test_pattern(value); state_return = true; }
          if (true == state_return) {
            id(espcam).update_camera_parameters();
          }
          else {
            ESP_LOGW("esp32_camera_set_param", "Error in name or data range");
          }

ota:
  password: "09e4b58a1d186b8b33d100548f33d796"

wifi:
  ssid: !secret wifi_ssid
  password: !secret wifi_password

  power_save_mode: none

  # Enable fallback hotspot (captive portal) in case wifi connection fails
  ap:
    ssid: "Esp32Cam Fallback Hotspot"
    password: "GTIKgjitx2Re"

captive_portal:

# Example configuration entry
esp32_camera:
  id: espcam
  name: esp-cam
  external_clock:
    pin: GPIO0
    frequency: 20MHz
  i2c_pins:
    sda: GPIO26
    scl: GPIO27
  data_pins: [GPIO5, GPIO18, GPIO19, GPIO21, GPIO36, GPIO39, GPIO34, GPIO35]
  vsync_pin: GPIO25
  href_pin: GPIO23
  pixel_clock_pin: GPIO22
  power_down_pin: GPIO32

  resolution: 800x600
  jpeg_quality: 10  # max. 63
  max_framerate: 1.0fps
  idle_framerate: 0.2fps
  vertical_flip: true
  horizontal_mirror: false
  brightness: 2 # -2 to 2
  contrast: 1 # -2 to 2
  special_effect: none
  # exposure settings
  aec_mode: auto
  aec2: false
  ae_level: 0
  aec_value: 300
  # gain settings
  agc_mode: auto
  agc_gain_ceiling: 2x
  agc_value: 0
  # white balance setting
  wb_mode: auto
output:
# white LED
  - platform: ledc
    channel: 2
    pin: GPIO4
    id: espCamLED
# red status light
  - platform: gpio
    pin:
      number: GPIO33
      inverted: True
    id: gpio_33
light:
  - platform: monochromatic
    output: espCamLED
    name: esp-cam light
  - platform: binary
    output: gpio_33
    name: esp-cam led
switch:
  - platform: restart
    name: esp-cam restart
binary_sensor:
  - platform: status
    name: esp-cam status
milkv duoshttps://milkv.io/docs/duo/getting-started/duos
dpavlin@nuc:/nuc/milkv-duo$ git clone https://github.com/milkv-duo/duo-buildroot-sdk

sudo apt install mtools

sudo apt install genext2fs

# needed to find tune2fs as nornal user

export PATH=/sbin:$PATH

./build.sh milkv-duos-sd

Create SD image successful: out/milkv-duos-sd-20240606-1431.img

dpavlin@nuc:/nuc/milkv-duo/duo-buildroot-sdk$ ~/dd.sh out/milkv-duos-sd-20240606-1431.img /dev/mmcblk0
+ dd iflag=fullblock oflag=direct conv=fsync status=progress bs=1M if=out/milkv-duos-sd-20240606-1431.img of=/dev/mmcblk0
939524096 bytes (940 MB, 896 MiB) copied, 200 s, 4.7 MB/s941621760 bytes (942 MB, 898 MiB) copied, 200.616 s, 4.7 MB/s

[352064.918998] usb 1-3.3.1: new high-speed USB device number 16 using xhci_hcd
[352065.459038] usb 1-3.3.1: device descriptor read/64, error -71
[352065.668066] usb 1-3.3.1: New USB device found, idVendor=3346, idProduct=1009, bcdDevice= 5.10
[352065.668088] usb 1-3.3.1: New USB device strings: Mfr=1, Product=2, SerialNumber=3
[352065.668094] usb 1-3.3.1: Product: RNDIS
[352065.668098] usb 1-3.3.1: Manufacturer: Cvitek
[352065.668102] usb 1-3.3.1: SerialNumber: 0123456789
[352065.723863] usbcore: registered new interface driver cdc_ether
[352065.729953] rndis_host 1-3.3.1:1.0 usb0: register 'rndis_host' at usb-0000:00:14.0-3.3.1, RNDIS device, ea:8e:70:96:05:d4
[352065.729990] usbcore: registered new interface driver rndis_host
[352065.737594] rndis_host 1-3.3.1:1.0 enxea8e709605d4: renamed from usb0

dpavlin@nuc:/nuc/milkv-duo/duo-buildroot-sdk$ sudo dhclient enxea8e709605d4
dpavlin@nuc:/nuc/milkv-duo/duo-buildroot-sdk$ ip a
9: enxea8e709605d4: <BROADCAST,MULTICAST,UP,LOWER_UP> mtu 1500 qdisc fq_codel state UNKNOWN group default qlen 1000
    link/ether ea:8e:70:96:05:d4 brd ff:ff:ff:ff:ff:ff
    inet 192.168.42.201/24 brd 192.168.42.255 scope global dynamic enxea8e709605d4
       valid_lft 3594sec preferred_lft 3594sec
    inet6 fe80::e88e:70ff:fe96:5d4/64 scope link proto kernel_ll
       valid_lft forever preferred_lft forever

dpavlin@nuc:/nuc/milkv-duo/duo-buildroot-sdk$ ssh root@192.168.42.1
The authenticity of host '192.168.42.1 (192.168.42.1)' can't be established.
ED25519 key fingerprint is SHA256:sfqq5/VjPb++J6gD4Q8/JxUn6u2geewQcqPwIjJHiF4.
This key is not known by any other names.
Are you sure you want to continue connecting (yes/no/[fingerprint])? yes
Warning: Permanently added '192.168.42.1' (ED25519) to the list of known hosts.
root@192.168.42.1's password: milkv
[root@milkv-duo]~# uname -a
Linux milkv-duo 5.10.4-tag- #1 PREEMPT Thu Jun 6 14:28:13 CEST 2024 riscv64 GNU/Linux
[root@milkv-duo]~# free
              total used free shared buff/cache available
Mem: 330960 22544 296852 148 11564 300552
Swap: 0 0 0
[root@milkv-duo]~# cat /proc/cpuinfo
processor	: 0
hart		: 0
isa		: rv64imafdvcsu
mmu		: sv39
https://www.nordicsemi.com/Products/Development-hardware/Power-Profiler-Kit-2 python supporthttps://github.com/IRNAS/ppk2-api-python pi@pihdmi:~/ppk2-api-python $ git remote -v origin https://github.com/IRNAS/ppk2-api-python (fetch) origin https://github.com/IRNAS/ppk2-api-python (push) pi@pihdmi:~/ppk2-api-python $ sudo python3 setup.py install
ESP32-Devkit-Pinout_19.pdf https://github.com/espressif/arduino-esp32/issues/544 ESP32 DEVKIT1schematic: SchematicsforESP32.pdf to get into bootloader mode (out of box) plug module in (red led will show that it has power from usb) and: press EN - press BOOT - release EN - release BOOT dpavlin@x200:/mnt/nuc/esptool$ ./esptool.py -p /dev/ttyUSB0 --chip esp32 read_mac esptool.py v2.7-dev Serial port /dev/ttyUSB0 Connecting........_ Chip is ESP32D0WDQ6 (revision 1) Features: WiFi, BT, Dual Core, 240MHz, VRef calibration in efuse, Coding Scheme None MAC: 3c:71:bf:aa:fc:24 Uploading stub... Running stub... Stub running... MAC: 3c:71:bf:aa:fc:24 Hard resetting via RTS pin... dpavlin@x200:/mnt/nuc/esptool$ ./esptool.py -p /dev/ttyUSB0 --chip esp32 chip_id esptool.py v2.7-dev Serial port /dev/ttyUSB0 Connecting........__ Chip is ESP32D0WDQ6 (revision 1) Features: WiFi, BT, Dual Core, 240MHz, VRef calibration in efuse, Coding Scheme None MAC: 3c:71:bf:aa:fc:24 Uploading stub... Running stub... Stub running... Warning: ESP32 has no Chip ID. Reading MAC instead. MAC: 3c:71:bf:aa:fc:24 Hard resetting via RTS pin... dpavlin@x200:/mnt/nuc/esptool$ ./esptool.py -p /dev/ttyUSB0 --chip esp32 flash_id esptool.py v2.7-dev Serial port /dev/ttyUSB0 Connecting........_____....._____....._____....._____. Chip is ESP32D0WDQ6 (revision 1) Features: WiFi, BT, Dual Core, 240MHz, VRef calibration in efuse, Coding Scheme None MAC: 3c:71:bf:aa:fc:24 Uploading stub... Running stub... Stub running... Manufacturer: 20 Device: 4016 Detected flash size: 4MB Hard resetting via RTS pin... setuphttps://docs.espressif.com/projects/esp-idf/en/latest/get-started/index.html#setup-toolchain dpavlin@nuc:/nuc/esp32$ wget https://dl.espressif.com/dl/xtensa-esp32-elf-linux64-1.22.0-80-g6c4433a-5.2.0.tar.gz dpavlin@nuc:/nuc/esp32$ tar tvf xtensa-esp32-elf-linux64-1.22.0-80-g6c4433a-5.2.0.tar.gz dpavlin@nuc:/nuc/esp32$ git clone --recursive https://github.com/espressif/esp-idf.git dpavlin@nuc:/nuc/esp32$ cd esp-idf/ dpavlin@nuc:/nuc/esp32/esp-idf$ cat env.sh export IDF_PATH=/nuc/esp32/esp-idf export PATH=/nuc/esp32/xtensa-esp32-elf/bin/:$PATH dpavlin@nuc:/nuc/esp32/esp-idf$ . env.sh dpavlin@nuc:/nuc/esp32/esp-idf$ python2 -m pip install --user -r $IDF_PATH/requirements.txt Requirement already satisfied: setuptools in /usr/lib/python2.7/dist-packages (from -r /nuc/esp32/esp-idf/requirements.txt (line 4)) (40.6.2) Requirement already satisfied: pyserial>=3.0 in /home/dpavlin/.local/lib/python2.7/site-packages (from -r /nuc/esp32/esp-idf/requirements.txt (line 8)) (3.4) Requirement already satisfied: future>=0.15.2 in /usr/lib/python2.7/dist-packages (from -r /nuc/esp32/esp-idf/requirements.txt (line 9)) (0.15.2) Requirement already satisfied: cryptography>=2.1.4 in /usr/lib/python2.7/dist-packages (from -r /nuc/esp32/esp-idf/requirements.txt (line 10)) (2.3) Requirement already satisfied: pyparsing>=2.0.3 in /usr/lib/python2.7/dist-packages (from -r /nuc/esp32/esp-idf/requirements.txt (line 11)) (2.2.0) WT32-ETH01https://www.raspberrypi.com/documentation/microcontrollers/rp2040.html pythonhttps://datasheets.raspberrypi.com/pico/getting-started-with-pico.pdf 1.8TFTST7755 pinout of connector, rp2040 pins
VCC https://github.com/boochow/MicroPython-ST7735 spi = SPI(0, baudrate=20000000, polarity=0, phase=0, sck=Pin(18), mosi=Pin(19), miso=Pin(16)) tft=TFT(spi,20,16,17) |
Weblog Archives
|

