|
Weblog: home-assistant

in Dobrica Pavlinušić's random unstructured stuff
|
|
|
https://github.com/raphaelbs/esp32-cam-ai-thinker/blob/master/docs/about-esp32-cam.md connection, flashingconnected to pl2303 serial
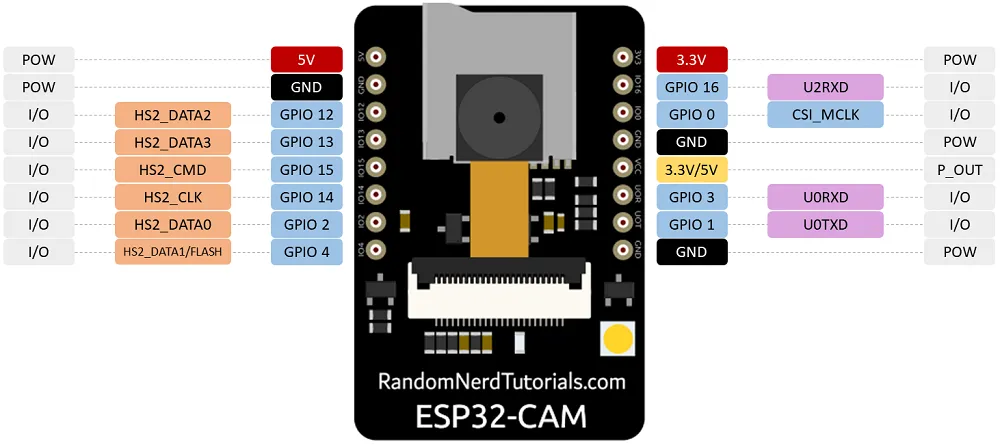 To program the board, I userd jumper to jump GPIO0 with GND pin next to it. https://github.com/raphaelbs/esp32-cam-ai-thinker/blob/master/docs/esp32cam-pin-notes.md spiSDI = IO12 SDO = IO13 SCK = IO14 CS = IO15 improved example apphttps://github.com/easytarget/esp32-cam-webserver cp myconfig.sample.h myconfig.h vi myconfig.h dpavlin@nuc:/nuc/esp32/esp32-cam-webserver$ platformio run dpavlin@nuc:/nuc/esp32/esp32-cam-webserver$ pio run -t upload --upload-port /dev/ttyUSB2 "/home/dpavlin/.platformio/penv/bin/python" "/home/dpavlin/.platformio/packages/tool-esptoolpy/esptool.py" \ --chip esp32 --port "/dev/ttyUSB3" --baud 460800 --before default_reset --after hard_reset \ write_flash -z --flash_mode dio --flash_freq 40m --flash_size detect \ 0x1000 /home/dpavlin/.platformio/packages/framework-arduinoespressif32/tools/sdk/bin/bootloader_dio_40m.bin \ 0x8000 /nuc/esp32/esp32-cam-webserver/.pio/build/esp32cam/partitions.bin \ 0xe000 /home/dpavlin/.platformio/packages/framework-arduinoespressif32/tools/partitions/boot_app0.bin \ 0x10000 .pio/build/esp32cam/firmware.bin timelapseocr on devicehttps://github.com/jomjol/AI-on-the-edge-device https://github.com/jomjol/AI-on-the-edge-device/wiki/Installation
Remove glue from lens (very hard, using sharp knife), and rotate lens by 45 degrees until dpavlin@nuc:/nuc/esp32/AI-on-the-edge-device$ vi sd-card/wlan.ini dpavlin@nuc:/nuc/esp32/AI-on-the-edge-device/code$ pio run dpavlin@nuc:/nuc/esp32/AI-on-the-edge-device/code$ pio run -v -t upload --upload-port /dev/ttyUSB3 "/home/dpavlin/.platformio/penv/bin/python" "/home/dpavlin/.platformio/packages/tool-esptoolpy/esptool.py" \ --chip esp32 --port "/dev/ttyUSB3" --baud 460800 --before default_reset --after hard_reset \ write_flash -z --flash_mode dio --flash_freq 40m --flash_size detect \ 0x1000 /nuc/esp32/AI-on-the-edge-device/code/.pio/build/esp32cam/bootloader.bin \ 0x8000 /nuc/esp32/AI-on-the-edge-device/code/.pio/build/esp32cam/partitions.bin \ 0xd000 /nuc/esp32/AI-on-the-edge-device/code/.pio/build/esp32cam/ota_data_initial.bin \ 0x10000 .pio/build/esp32cam/firmware.bin # original flashing instructions esptool write_flash 0x01000 bootloader.bin 0x08000 partitions.bin 0x10000 firmware.bin # download raw picture wget 192.168.3.112/img_tmp/raw.jpg old, obsolete problemsIt seems that my module is usually known as AI thinker variant. It has terrible picture which starts with huge green bias. It also doesn't work for me in resolutions below 1024x768 (in current esp32 example as of 2019-08-02). Plugging it into external 5V power supply did not helped much. To solve green tint, I just left esp32cam module plugged in whole day and night. I guess that image sensor got discharged during night, but next day picture was fine. Problem with image resolution was fixed by updating to more recent version of ESP32 support for Arduino (as of 2020-04-20 it works fine) Home Assistanthttps://jamesachambers.com/cheap-esp32-cam-home-assistant-esphome-camera-guide/
esphome:
  name: esp32cam
  friendly_name: esp32cam

esp32:
  board: esp32cam
  framework:
    type: arduino

# Enable logging
logger:
  level: VERBOSE
  tx_buffer_size: 256

# Enable Home Assistant API
api:
  encryption:
    key: "MsJJJiDv9FTjZ1w8dfoy3Z8cQWjGOsk0m4Wgge0B+8w="
  services:  # change camera parameters on-the-fly
  - service: camera_set_param
    variables:
      name: string
      value: int
    then:
      - lambda: |-
          bool state_return = false;
          if (("contrast" == name) && (value >= -2) && (value <= 2)) { id(espcam).set_contrast(value); state_return = true; }
          if (("brightness" == name) && (value >= -2) && (value <= 2)) { id(espcam).set_brightness(value); state_return = true; }
          if (("saturation" == name) && (value >= -2) && (value <= 2)) { id(espcam).set_saturation(value); state_return = true; }
          if (("special_effect" == name) && (value >= 0U) && (value <= 6U)) { id(espcam).set_special_effect((esphome::esp32_camera::ESP32SpecialEffect)value); state_return = true; }
          if (("aec_mode" == name) && (value >= 0U) && (value <= 1U)) { id(espcam).set_aec_mode((esphome::esp32_camera::ESP32GainControlMode)value); state_return = true; }
          if (("aec2" == name) && (value >= 0U) && (value <= 1U)) { id(espcam).set_aec2(value); state_return = true; }
          if (("ae_level" == name) && (value >= -2) && (value <= 2)) { id(espcam).set_ae_level(value); state_return = true; }
          if (("aec_value" == name) && (value >= 0U) && (value <= 1200U)) { id(espcam).set_aec_value(value); state_return = true; }
          if (("agc_mode" == name) && (value >= 0U) && (value <= 1U)) { id(espcam).set_agc_mode((esphome::esp32_camera::ESP32GainControlMode)value); state_return = true; }
          if (("agc_value" == name) && (value >= 0U) && (value <= 30U)) { id(espcam).set_agc_value(value); state_return = true; }
          if (("agc_gain_ceiling" == name) && (value >= 0U) && (value <= 6U)) { id(espcam).set_agc_gain_ceiling((esphome::esp32_camera::ESP32AgcGainCeiling)value); state_return = true; }
          if (("wb_mode" == name) && (value >= 0U) && (value <= 4U)) { id(espcam).set_wb_mode((esphome::esp32_camera::ESP32WhiteBalanceMode)value); state_return = true; }
          if (("test_pattern" == name) && (value >= 0U) && (value <= 1U)) { id(espcam).set_test_pattern(value); state_return = true; }
          if (true == state_return) {
            id(espcam).update_camera_parameters();
          }
          else {
            ESP_LOGW("esp32_camera_set_param", "Error in name or data range");
          }

ota:
  password: "09e4b58a1d186b8b33d100548f33d796"

wifi:
  ssid: !secret wifi_ssid
  password: !secret wifi_password

  power_save_mode: none

  # Enable fallback hotspot (captive portal) in case wifi connection fails
  ap:
    ssid: "Esp32Cam Fallback Hotspot"
    password: "GTIKgjitx2Re"

captive_portal:

# Example configuration entry
esp32_camera:
  id: espcam
  name: esp-cam
  external_clock:
    pin: GPIO0
    frequency: 20MHz
  i2c_pins:
    sda: GPIO26
    scl: GPIO27
  data_pins: [GPIO5, GPIO18, GPIO19, GPIO21, GPIO36, GPIO39, GPIO34, GPIO35]
  vsync_pin: GPIO25
  href_pin: GPIO23
  pixel_clock_pin: GPIO22
  power_down_pin: GPIO32

  resolution: 800x600
  jpeg_quality: 10  # max. 63
  max_framerate: 1.0fps
  idle_framerate: 0.2fps
  vertical_flip: true
  horizontal_mirror: false
  brightness: 2 # -2 to 2
  contrast: 1 # -2 to 2
  special_effect: none
  # exposure settings
  aec_mode: auto
  aec2: false
  ae_level: 0
  aec_value: 300
  # gain settings
  agc_mode: auto
  agc_gain_ceiling: 2x
  agc_value: 0
  # white balance setting
  wb_mode: auto
output:
# white LED
  - platform: ledc
    channel: 2
    pin: GPIO4
    id: espCamLED
# red status light
  - platform: gpio
    pin:
      number: GPIO33
      inverted: True
    id: gpio_33
light:
  - platform: monochromatic
    output: espCamLED
    name: esp-cam light
  - platform: binary
    output: gpio_33
    name: esp-cam led
switch:
  - platform: restart
    name: esp-cam restart
binary_sensor:
  - platform: status
    name: esp-cam status
TV power button
show_name: true
show_icon: true
type: button
tap_action:
  action: call-service
  service: mqtt.publish
  data:
    topic: cmnd/ir/IRSend
    payload: '{"protocol": "NEC","bits": 32, "data": 0x20DF10EF}'
  target: {}
icon: mdi:television
CJMCU-811 CCS811 Carbon Monoxide CO VOCs Air Quality Digital Gas Sensor pins
VCC this is directly connected to the IC (there is no voltage regulator on board), connect this to 3.3V firmware upgradehttps://github.com/maarten-pennings/CCS811/tree/master/examples/ccs811flash dpavlin@nuc:~/Arduino/libraries$ git clone https://github.com/maarten-pennings/CCS811 Wiring for ESP8266 NodeMCU boards: VDD to 3V3, GND to GND, SDA to D2, SCL to D1, nWAKE to D3 (or GND) Serial output with sensor out of (china) bag: setup: Starting CCS811 basic demo setup: ccs811 lib version: 12 setup: hardware version: 12 setup: bootloader version: 1000 setup: application version: 1100 CCS811: waiting for (new) data CCS811: waiting for (new) data CCS811: eco2=0 ppm etvoc=0 ppb CCS811: eco2=0 ppm etvoc=0 ppb CCS811: eco2=0 ppm etvoc=0 ppb CCS811: eco2=400 ppm etvoc=0 ppb CCS811: eco2=400 ppm etvoc=0 ppb CCS811: eco2=400 ppm etvoc=0 ppb CCS811: eco2=400 ppm etvoc=0 ppb CCS811: eco2=400 ppm etvoc=0 ppb CCS811: eco2=400 ppm etvoc=0 ppb CCS811: eco2=400 ppm etvoc=0 ppb CCS811: eco2=400 ppm etvoc=0 ppb CCS811: eco2=400 ppm etvoc=0 ppb CCS811: eco2=400 ppm etvoc=0 ppb CCS811: eco2=400 ppm etvoc=0 ppb CCS811: eco2=400 ppm etvoc=0 ppb CCS811: eco2=400 ppm etvoc=0 ppb CCS811: eco2=400 ppm etvoc=0 ppb CCS811: eco2=400 ppm etvoc=0 ppb upgrade serial outputStarting CCS811 flasher setup: library version: 12 setup: hardware version: 12 setup: bootloader version: 1000 setup: application version: 1100 setup: comment-out this code line if you want to flash loop: ended ... loop: ended ... loop: ended ... loop: ended ... loop: ended ... loop: ended ... loop: ended ... loop: ended ... ccs811: ping ok ccs811: reset ok ccs811: status (reset1) 10 ok ccs811: app-erase ok ccs811: status (app-erase) 40 ok ccs811: writing 5120 ................................................................ 4608 ccs811: writing 4608 ................................................................ 4096 ccs811: writing 4096 ................................................................ 3584 ccs811: writing 3584 ................................................................ 3072 ccs811: writing 3072 ................................................................ 2560 ccs811: writing 2560 ................................................................ 2048 ccs811: writing 2048 ................................................................ 1536 ccs811: writing 1536 ................................................................ 1024 ccs811: writing 1024 ................................................................ 512 ccs811: writing 512 ................................................................ 0 ccs811: app-verify ok ccs811: status (app-verify) 30 ok ccs811: reset2 ok ccs811: status (reset2) 10 ok setup: Starting CCS811 basic demo setup: ccs811 lib version: 12 setup: hardware version: 12 setup: bootloader version: 1000 setup: application version: 2000 CCS811: waiting for (new) data CCS811: waiting for (new) data CCS811: waiting for (new) data CCS811: waiting for (new) data CCS811: eco2=400 ppm etvoc=0 ppb CCS811: eco2=400 ppm etvoc=0 ppb CCS811: eco2=409 ppm etvoc=1 ppb CCS811: eco2=414 ppm etvoc=2 ppb CCS811: eco2=400 ppm etvoc=0 ppb CCS811: eco2=400 ppm etvoc=0 ppb CCS811: eco2=400 ppm etvoc=0 ppb CCS811: eco2=407 ppm etvoc=1 ppb CCS811: eco2=400 ppm etvoc=0 ppb CCS811: eco2=400 ppm etvoc=0 ppb CCS811: eco2=400 ppm etvoc=0 ppb CCS811: eco2=408 ppm etvoc=1 ppb CCS811: eco2=414 ppm etvoc=2 ppb CCS811: eco2=417 ppm etvoc=2 ppb CCS811: eco2=414 ppm etvoc=2 ppb CCS811: eco2=408 ppm etvoc=1 ppb CCS811: eco2=408 ppm etvoc=1 ppb CCS811: eco2=400 ppm etvoc=0 ppb CCS811: eco2=400 ppm etvoc=0 ppb CCS811: eco2=400 ppm etvoc=0 ppb CCS811: eco2=406 ppm etvoc=0 ppb CCS811: eco2=400 ppm etvoc=0 ppb Since my sensor is new, I used firmware 2.0.0 to allow initial burn-in compensation. temperature compensationesphome
esphome:
  name: ccs811
  friendly_name: ccs811

esp8266:
  board: nodemcuv2

# Enable logging
logger:

# Enable Home Assistant API
api:
  encryption:
    key: "XXXXXXXXXXXXXXXXXXXXXXXXXXXXXXXXXXXXXXXXXXX="

ota:
  password: "XXXXXXXXXXXXXXXXXXXXXXXXXXXXXXXX"

wifi:
  ssid: !secret wifi_ssid
  password: !secret wifi_password

  # Enable fallback hotspot (captive portal) in case wifi connection fails
  ap:
    ssid: "Ccs811 Fallback Hotspot"
    password: "XXXXXXXXXXXX"

captive_portal:

  # Example configuration entry
i2c:
  sda: D2
  scl: D1

sensor:
  - platform: ccs811
    eco2:
      name: "CCS811 eCO2 Value"
    tvoc:
      name: "CCS811 Total Volatile Organic Compound"
    address: 0x5A
    update_interval: 15s

  - platform: bme280
    temperature:
      name: "BME280 Temperature"
      id: bme280_temperature
    pressure:
      name: "BME280 Pressure"
      id: bme280_pressure
    humidity:
      name: "BME280 Relative Humidity"
      id: bme280_humidity
    address: 0x76
    update_interval: 15s
|
Weblog Archives
|